Self-Hosting a Wiki with SSO: Deploying Authentik and Outline in My Homelab
So this week I deployed Outline, a self-hosted wiki, secured behind Authentik as a single sign-on provider. This post is a full walkthrough of the deployment — including the parts that didn't go smoothly, because I think the debugging is often more useful than the happy path.


If you've been following along with my homelab journey, you'll know documentation has become a bigger priority for me this year — partly because good documentation is genuinely useful, and partly because in cybersecurity and infrastructure roles, "I run a homelab" only carries weight if you can back it up with evidence of disciplined practice.
So this week, I deployed Outline, a self-hosted wiki, secured behind Authentik as a single sign-on provider. This post is a full walkthrough of the deployment — including the parts that didn't go smoothly — because I think debugging is often more useful than the happy path.
Why Authentik and Outline
Outline is a clean, fast, markdown-friendly wiki that's genuinely pleasant to use day to day. But it doesn't ship with its own username/password login — it expects you to delegate authentication to an identity provider. For a homelab, that's actually a feature, not a limitation: it means you can centralise login across multiple self-hosted apps rather than maintaining separate credentials everywhere.
Authentik is a self-hosted identity provider supporting OIDC, SAML, and more. It's more homelab-friendly than Keycloak (which I'd describe as powerful but heavyweight) and gives you a real taste of how enterprise SSO works.
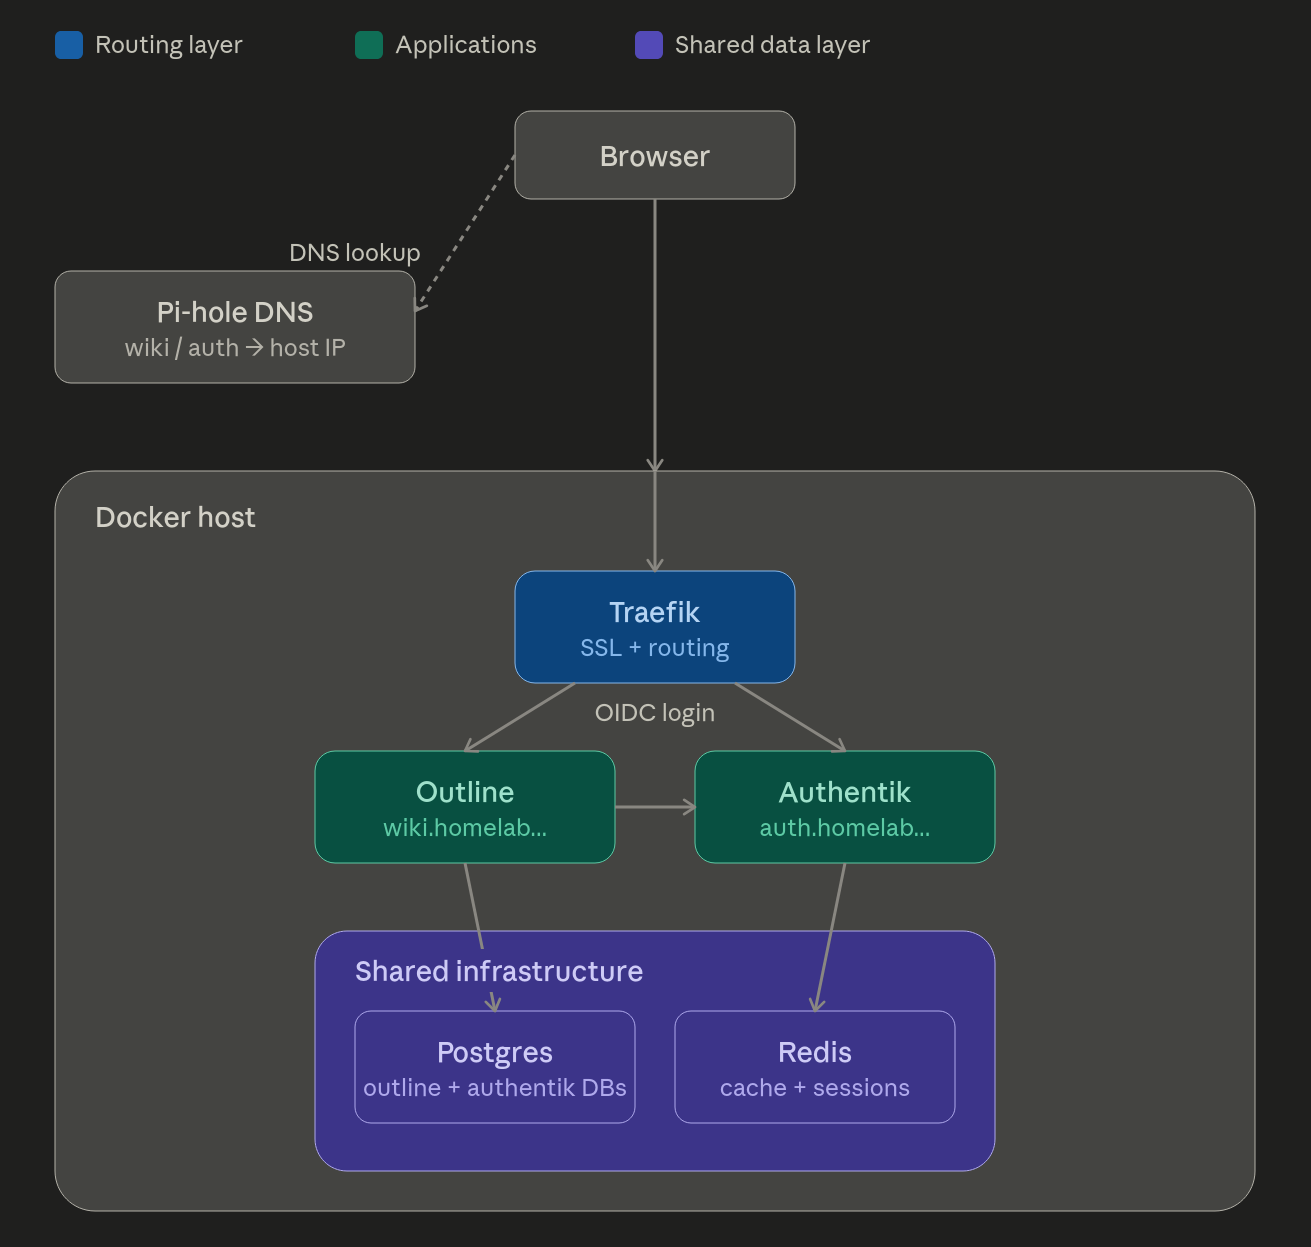
The stack ends up looking like this:
Postgres (shared database)
Redis (shared cache/session store)
Authentik (identity provider)
Outline (wiki, authenticates via Authentik)
Traefik (reverse proxy + SSL termination)
Step 1 — Shared Postgres and Redis
Rather than running a separate database container per app, I run a single shared Postgres instance with a separate database per app. Outline gets its own database, Authentik gets its own, and anything I add later gets its own. This mirrors how it's typically done in production — one database server, many databases — and it's easier to back up and manage than a sprawl of single-purpose containers.
services:
  postgres:
    image: postgres:16-alpine
    container_name: postgres
    restart: unless-stopped
    environment:
      POSTGRES_USER: admin
      POSTGRES_PASSWORD: ${POSTGRES_PASSWORD}
      POSTGRES_DB: authentik
    volumes:
      - postgres_data:/var/lib/postgresql/data
    networks:
      - internal

  redis:
    image: redis:7-alpine
    container_name: redis
    restart: unless-stopped
    command: --save 60 1 --loglevel warning
    volumes:
      - redis_data:/data
    networks:
      - internal
Step 2 — Authentik
Authentik runs as two services: a server (which handles the login UI and OIDC endpoints) and a worker (which handles background tasks such as email and event processing).
  authentik-server:
    image: ghcr.io/goauthentik/server:2024.12
    container_name: authentik-server
    restart: unless-stopped
    command: server
    environment:
      AUTHENTIK_REDIS__HOST: redis
      AUTHENTIK_POSTGRESQL__HOST: postgres
      AUTHENTIK_POSTGRESQL__USER: admin
      AUTHENTIK_POSTGRESQL__NAME: authentik
      AUTHENTIK_POSTGRESQL__PASSWORD: ${POSTGRES_PASSWORD}
      AUTHENTIK_SECRET_KEY: ${AUTHENTIK_SECRET_KEY}
    volumes:
      - authentik_media:/media
      - authentik_templates:/templates
    networks:
      - internal
      - proxy
    depends_on:
      - postgres
      - redis

  authentik-worker:
    image: ghcr.io/goauthentik/server:2024.12
    container_name: authentik-worker
    restart: unless-stopped
    command: worker
    environment:
      AUTHENTIK_REDIS__HOST: redis
      AUTHENTIK_POSTGRESQL__HOST: postgres
      AUTHENTIK_POSTGRESQL__USER: admin
      AUTHENTIK_POSTGRESQL__NAME: authentik
      AUTHENTIK_POSTGRESQL__PASSWORD: ${POSTGRES_PASSWORD}
      AUTHENTIK_SECRET_KEY: ${AUTHENTIK_SECRET_KEY}
    volumes:
      - authentik_media:/media
      - /var/run/docker.sock:/var/run/docker.sock
    networks:
      - internal
Generate the two required secrets:
openssl rand -base64 32   # POSTGRES_PASSWORD
openssl rand -base64 60   # AUTHENTIK_SECRET_KEY
Bring the stack up:
docker compose up -dGive it a minute or two to fully initialise — Authentik performs initial database setup on startup. You can watch the logs to see when it's ready:
docker compose logs authentik-server --tail 20Once it's settled, open your browser and complete the initial setup. If you haven't set up DNS or a reverse proxy yet, the simplest way to reach it for this first step is directly by IP and port. Add a temporary port mapping to the authentik-server service in your compose file:
yaml
    ports:
      - "9001:9000"
(Pick a free port on your host — 9000 is taken by default on many systems, commonly by Portainer, so I used 9001.)
Bring it back up to apply the change:
bash
docker compose up -dThen, in your browser, go to:
http://YOUR_DOCKER_HOST_IP:9001/if/flow/initial-setup/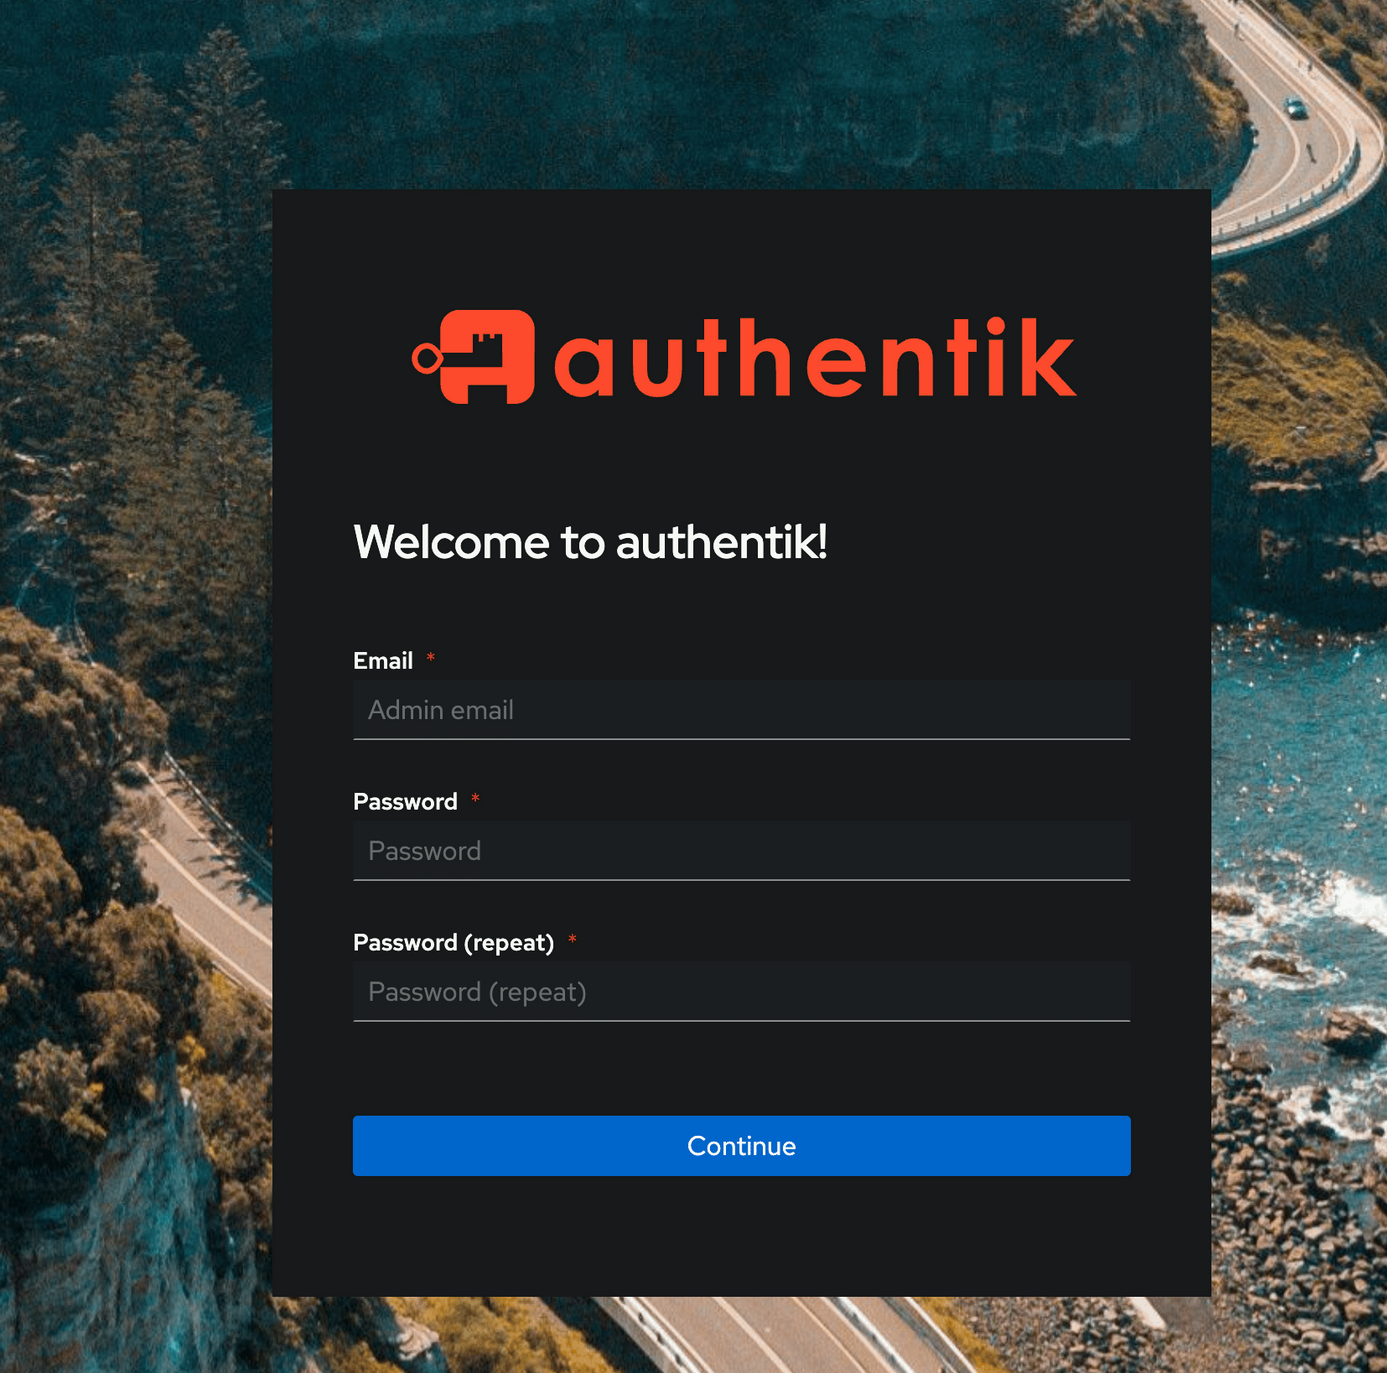
Replace YOUR_DOCKER_HOST_IP with the actual IP address of the machine running Docker — for example http://192.168.1.50:9001/if/flow/initial-setup/. You'll be prompted to set an admin email and password. Once that's done, you can log in to the admin panel at the same address without the /if/flow/initial-setup/ path.
Once you've set up a proper domain and reverse proxy pointing to Authentik later in this guide, you can remove the temporary port mapping — Traefik will handle access from then on.
Creating the OIDC provider for Outline:
In Authentik admin → Applications → Providers → Create → OAuth2/OpenID Provider:
- Client Type: Confidential
- Redirect URIs:
https://your-outline-domain/auth/oidc.callback - Signing Key: default self-signed certificate
Save and note down the Client ID and Client Secret — you'll need them for Outline. Then create an Application that links to this provider.
Step 3 — Outline
Outline connects to the shared Postgres database (its own database within the instance), the shared Redis, and Authentik as its OIDC provider.
  outline:
    image: outlinewiki/outline:latest
    container_name: outline
    restart: unless-stopped
    environment:
      SECRET_KEY: ${SECRET_KEY}
      UTILS_SECRET: ${UTILS_SECRET}
      URL: https://your-outline-domain
      DATABASE_URL: postgres://admin:${POSTGRES_PASSWORD}@postgres:5432/outline
      PGSSLMODE: disable
      REDIS_URL: redis://redis:6379
      OIDC_CLIENT_ID: ${OIDC_CLIENT_ID}
      OIDC_CLIENT_SECRET: ${OIDC_CLIENT_SECRET}
      OIDC_AUTH_URI: https://your-authentik-domain/application/o/authorize/
      OIDC_TOKEN_URI: https://your-authentik-domain/application/o/token/
      OIDC_USERINFO_URI: https://your-authentik-domain/application/o/userinfo/
      OIDC_DISPLAY_NAME: Authentik
      OIDC_USERNAME_CLAIM: email
      OIDC_SCOPES: openid profile email
      NODE_ENV: production
      ENABLE_UPDATES: false
    volumes:
      - outline_data:/var/lib/outline/data
    networks:
      - proxy
      - authentik_internal
You'll also need a one-off migration step before Outline first starts:
docker run --rm \
  --network authentik_internal \
  -e DATABASE_URL=postgres://admin:${POSTGRES_PASSWORD}@postgres:5432/outline \
  -e SECRET_KEY=${SECRET_KEY} \
  outlinewiki/outline:latest \
  sh -c "yarn db:migrate --env=production-ssl-disabled"
Create the Outline database on your shared Postgres instance first:
docker exec -it postgres psql -U admin -d authentik -c "CREATE DATABASE outline;"
One gotcha that cost me an hour: Outline's secret keys need to be in hex format, not base64. The error message is clear once you see it (SECRET_KEY must be exactly 64 hexadecimal characters) but it's easy to miss if you're used to generating secrets with openssl rand -base64. Use this instead:
openssl rand -hex 32 # for both SECRET_KEY and UTILS_SECRET
Step 4 — Routing it through Traefik
This is where things got more involved than expected, and where your setup might differ from mine.
If your Traefik instance uses Docker label-based routing (the more common approach, where you add traefik.* labels directly to each container), you can add labels to the Outline and Authentik services and Traefik will pick them up automatically, provided they're attached to your Traefik network. I cover the basics of Docker label routing in my Traefik post if you want a refresher.
My setup is a bit different — most of my existing services use file-based routing via a static config file, because several of my routed services (Pi-hole, Proxmox, TrueNAS) aren't Docker containers and can't carry labels. If you're in the same boat, here's the file-based router and service definition for both:
http:
  routers:
    outline:
      entryPoints:
        - "websecure"
      rule: "Host(`wiki.yourdomain.com`)"
      middlewares:
        - default-headers
      tls:
        certResolver: cloudflare
      service: outline

    authentik:
      entryPoints:
        - "websecure"
      rule: "Host(`auth.yourdomain.com`)"
      middlewares:
        - default-headers
      tls:
        certResolver: cloudflare
      service: authentik

  services:
    outline:
      loadBalancer:
        servers:
          - url: "http://outline:3000"
        passHostHeader: true

    authentik:
      loadBalancer:
        servers:
          - url: "http://authentik-server:9000"
        passHostHeader: true
Two important details that aren't obvious from the Traefik docs:
The priority A field that is valid in Docker label routing is not valid in a valid field in file-based router config. Including it will cause Traefik to silently reject the entire file with a field not found, node: priority error.
And reference containers by their Docker container name, not by host IP and port. http://outline:3000 works because Traefik and Outline share the same Docker network — the container name resolves internally. If you point at the host IP and port instead, you'll need to keep a port mapping exposed on the host, which defeats some of the purpose of routing through Traefik in the first place.
Opening Outline for the First Time
Once Traefik is routing traffic correctly, open your wiki's URL in a browser. You should land on a login screen with a single option — "Login with Authentik" (or whatever display name you gave the provider). Click it, you'll be redirected to Authentik to sign in with the admin account you created earlier, and then bounced back into Outline as a fully authenticated user.
The first account to log in becomes the Outline workspace owner, so make sure it's the account you intend to use going forward.
Setting Up Your Workspace
Before diving in and creating documents, it's worth spending 10 minutes on structure — outlining top-level folders and Collections, and getting this right early saves a lot of reorganising later.
My recommendation, based on what's worked for documenting a homelab, is to start with a small number of broad collections rather than lots of narrow ones:
- Infrastructure — network reference, service inventory, hardware specs — anything describing the current state of things
- Runbooks — step-by-step procedures: backups, restores, deployments, anything you'd want to follow exactly during an outage
- Incidents — post-mortems, written up after something breaks and gets fixed
- Security — firewall rules, VLAN policies, access control notes, anything security-specific
You don't need more than this to start. Resist the urge to create a collection for every individual service — a single Infrastructure collection with well-titled documents inside it is easier to navigate than a sprawl of single-purpose collections.
For each collection, set the permission to No access for other members unless you're sharing the workspace, and turn off public document sharing — this is your internal documentation, not something you want search engines to index.
How I Actually Use It
A few practices that have made the wiki genuinely useful rather than just another good intention:
Write the post-mortem the same day. The value of an incident write-up drops off fast — by the next day, you've forgotten half the specific error messages and the order you tried things in. I keep a scratch text file open during any troubleshooting session, jotting one line per step, then turn that into a proper post-mortem document immediately after the issue is resolved.
Keep a single source of truth per topic. Don't let your network details live across three documents that can drift out of sync — I learned this lesson the hard way with VLAN documentation that disagreed with itself between my blog and a diagram. One canonical Network Reference document, updated whenever something changes, is referenced from everywhere else.
Use tables liberally. Outline's markdown editor handles tables well, and for infrastructure documentation — IP addresses, ports, service names — a table is almost always clearer than prose.
Don't aim for completeness on day one. My wiki started with exactly one document — the post-mortem for deploying Outline itself, slightly meta but a good way to dogfood the tool immediately. Everything else was added over the following days as I revisited each part of the system.
The Debugging Journey
This is the part I want to be honest about, because most tutorials skip it, and that's exactly where the learning happens.
Remote access broke first. I was working over a Twingate VPN connection, and the internal hostnames simply wouldn't resolve. Twingate's free tier doesn't support DNS search domains, so queries for internal subdomains were routed to Cloudflare instead of my internal Pi-hole, resulting in NXDOMAIN responses. The workaround was a manual /etc/hosts entry pointing the hostname directly at the Docker host IP — not elegant, but it unblocked me immediately.
Then, a secure cookie error. Outline's OIDC flow sets a secure cookie during the OAuth handshake, which can't be sent over plain HTTP. Accessing the Outline by IP and port rather than its proper HTTPS hostname triggered Cannot send secure cookie over unencrypted connection. The fix wasn't a config flag — it was getting DNS working properly so I could access Outline over HTTPS as intended.
Then a 404 from Traefik. This took the longest to track down. My Outline Docker labels weren't being picked up — investigating the running container showed the Traefik labels simply weren't present despite being in the compose file. Rather than chase that down, I added Outline to my existing file-based config instead, which is how most of my other services are routed anyway.
Then YAML errors. Two separate problems are compounded here: a priority field that isn't valid in file-based config (only in Docker labels), and a stale fragment left over from an earlier failed edit sitting at the bottom of the config file, completely outside any valid section. YAML is unforgiving about structure — one misplaced block and the parser gives up on the whole file, not just the broken bit.
And finally, an expired API token. While debugging, I noticed Traefik's logs were full of certificate renewal failures going back three days — my Cloudflare API token had expired, and nobody had noticed because the existing wildcard certificate hadn't actually expired yet. A new token fixed it, but it's now on my list to set a renewal reminder for.
Each of these issues was small in itself. Together, they took a while to work through. I've written aon my internal wiki with the complete timeline — which is itself a nice bit of validation for the "write everything down" philosophy, since I was able to reconstruct this entire post largely from those notes.
What I'd Do Differently
A few lessons that are worth calling out explicitly:
Never hardcode environment-specific values directly in a Docker Compose file. I had URL: https://wiki.homelab.jimgogarty.com hardcoded rather than referencing ${URL} from the .env file, which meant changing the .env The value had no effect until I caught it.
Validate YAML files after every edit, not just at the end. A stale fragment from an earlier edit sat undetected in my config for nearly an hour because I kept editing other parts of the file without checking the whole thing was still valid.
Test remote access as part of any new deployment, not as an afterthought. If I'd checked Twingate access on day one rather than midway through, I'd have caught the DNS limitation earlier and planned around it properly.
Final Result
The outline is now live on my internal wiki domain, authenticated via Authentik, with proper HTTPS via Traefik and the wildcard certificate. I've already started populating it — a network reference document, a service inventory, a Pi-hole DNS runbook, and the post-mortem for this very deployment.
If you're building something similar, or you've hit a different flavour of these issues, I'd genuinely like to hear about it.
👉 Connect with me on LinkedIn or find more homelab write-ups on my blog.