Installing Traefik on Docker with Docker Compose


Welcome to another simplified guide on leveraging Docker for your web hosting needs! In this tutorial, we'll walk you through installing Traefik, a powerful reverse proxy and load balancer, on Docker using a docker-compose.yaml file. Even if you're not a tech whiz, you can follow along and set up your own Traefik instance quickly.
With Traefix, you can secure your local traffic, and you will never again receive an SSL error when you visit your local services.
Table of Contents
- Prerequisites
- Directory Structure
- docker-compose.yml
- Breaking Down docker-compose.yml
- Traefik Dashboard and Security.
- Installing an example Nginx Site.
- Launching Traefik and Nginx Containers
Prerequisites:
Before we begin, ensure you have Docker and Docker Compose installed on your system. If not, refer to our previous guides on installing Docker and Docker Compose on Ubuntu.
You will also need a Public domain; while you may not publish these services on the public internet, you will need this Domain for Cloudflare to create an SSL Cert for the subdomains you will make.
You will also need to be able to create local DNS records on your Home Lab Network. I use a PiHole server to do this. These records will be used to create A Records for the services you wish to use SSL on.
If you are a new visitor to the site, here is a link to all the blogs on Installing Docker in your home lab.

Directory Structure Setup
Firstly, let's ensure our directory structure is set up correctly:
/home/user/docker-compose
├── nGinx
│   ├── docker-compose.yaml
├── traefik
│   ├── docker-compose.yaml
│   ├── traefik.yaml
│   ├── acme.json
│   ├── config.yml
│   ├── logs
└── .env
 GogartyIT
Configuration Files
Copy the contents of the config.yml and the traefik.yml file from the above Github link to your server.
The Config file defines routers, services, and middlewares for various services accessible via different subdomains on the local network. Each router defines the rules for accessing a specific service, such as Proxmox, Pi-hole, Homebridge, Home Assistant, Syncthing, and others, using HTTPS. The services section specifies the backend servers for each service, including their URLs and ports. Middlewares are defined to enforce HTTPS redirection, add prefixes to certain routes, set default headers to enhance security, and configure access whitelist rules for specified IP ranges. You may not need all the services in this config file, but I just keep them in for future projects.
For this blog example add the following text to the top of the file under routers, like so
https:
 #region routers
  routers:
# nGinx Test
    nginx:
      entryPoints:
        - "websecure" # this is the entry point created in the treafik file,
      rule: "Host(`pihole1.gogartyit.ie`)" # dns entry on the two piholes
      middlewares:
        - default-headers
        - https-redirectscheme
      tls: {}
      service: nginx #this must be the same as as the servce below.

# PiHole1
    pihole:
      entryPoints:
You will also have need to add a nginx service to the services section.
Change the IP, later to the IP address of your nginx server.
#endregion
#region services
  services:
    nginx:
      loadBalancer:
        servers:
          - url: "http://192.168.0.10:80" # need to add the port to this config
        passHostHeader: true
This configuration file is used to set up Traefik, a modern reverse proxy and load balancer, with various settings for routing, handling HTTPS, server transports, Docker providers, and certificate resolvers.
- The API section enables the Traefik dashboard and debug mode.
- Entry points define how incoming requests are handled, with HTTP requests redirected to HTTPS for secure communication.
- Servers transport specifies settings related to server communication, such as skipping SSL certificate verification.
- Providers define where Traefik discovers configuration information, with Docker provider using Docker API and File provider using a YAML file.
- Certificates resolvers are configured for automatic SSL certificate management, with Cloudflare as the resolver using ACME protocol for certificate generation and DNS challenge method for domain validation. The resolvers section specifies DNS resolvers to use for domain verification.
Now inside the Traefik directory, create a new file named docker-compose.yml. This file will contain the configuration for our Traefik setup.
Below is the content for your docker-compose.yml file:
docker-compose.yml
version: '3.9'

networks:
  backend:
    external: true

volumes:

services:
    traefik:
    image: traefik:latest
    container_name: traefik
    restart: unless-stopped
#    security_opt:
#      - no-new-privileges:true
# -- (Optional) When using a custom network
    networks:
       proxy:
    ports:
      - 80:80
      - 443:443
      # -- (Optional) Enable Dashboard, don't do in production
      - 8080:8080
    environment:
      - CF_API_EMAIL=email@domain.com
      - CF_DNS_API_TOKEN=<CLOUDFLARE API FOR DNS>
    volumes:
      - /etc/localtime:/etc/localtime:ro
      - /var/run/docker.sock:/var/run/docker.sock:ro
      - ./traefik.yaml:/traefik.yml:ro
      - ./traefik/acme.json:/acme.json
      - ./traefik/config.yml:/config.yml:ro
      - ./traefik/logs:/var/log/traefik
    labels:
      - "traefik.enable=true"
      - "traefik.http.routers.traefik.entrypoints=web"
      - "traefik.http.routers.traefik.rule=Host(`traefik-dashboard.YOUR_DOMAIN.LOCAL`)"
      - "traefik.http.middlewares.traefik-auth.basicauth.users=USERNAME:PASSWORD"
      - "traefik.http.middlewares.traefik-https-redirect.redirectscheme.scheme=https"
      - "traefik.http.middlewares.sslheader.headers.customrequestheaders.X-Forwarded-Proto=https"
      - "traefik.http.routers.traefik.middlewares=traefik-https-redirect"
      - "traefik.http.routers.traefik-secure.entrypoints=websecure"
      - "traefik.http.routers.traefik-secure.rule=Host(`traefik-dashboard.YOUR_DOMAIN.LOCAL`)"
      - "traefik.http.routers.traefik-secure.middlewares=traefik-auth"
      - "traefik.http.routers.traefik-secure.tls=true"
      - "traefik.http.routers.traefik-secure.tls.certresolver=cloudflare"
      - "traefik.http.routers.traefik-secure.tls.domains[0].main=YOUR_DOMAIN.LOCAL"
      - "traefik.http.routers.traefik-secure.tls.domains[0].sans=*.YOUR_DOMAIN.LOCAL"
      - "traefik.http.routers.traefik-secure.service=api@internal"
Breaking Down docker-compose.yml
Let's break down the docker-compose.yaml file for setting up Traefik with Docker Compose:
version: '3.9'
This line specifies the version of the Docker Compose file format being used. In this case, it's version 3.9. Each version introduces different features and syntax, so it's essential to choose the appropriate version based on your requirements.
networks:
  backend:
    external: true
In this section, we define the networks that our services will use. Here, we specify the backend network as an external network. This means that the backend network is defined externally, likely in another Docker Compose file or by the Docker network driver.
services:
  traefik:
    image: traefik:latest
    container_name: traefik
    restart: unless-stopped
Now, we define the Traefik service. We specify the Traefik image (traefik:latest), set the container name to traefik, and configure it to restart automatically unless explicitly stopped.
    ports:
      - 80:80
      - 443:443
      - 8080:8080 # Optional: Enable Dashboard (do not use in production)
Here, we specify the ports that Traefik will listen on. Port 80 is for HTTP traffic, port 443 is for HTTPS traffic, and port 8080 is for the Traefik dashboard. Note that enabling the Traefik dashboard in production environments is not recommended for security reasons.
    environment:
      - CF_API_EMAIL=email@domain.com
      - CF_DNS_API_TOKEN=<CLOUDFLARE_API_FOR_DNS>
This section defines environment variables for Traefik. Here, we set the Cloudflare API email and DNS API token. Replace email@domain.com with your Cloudflare account email and <CLOUDFLARE_API_FOR_DNS> with your Cloudflare DNS API token.
    volumes:
      - /etc/localtime:/etc/localtime:ro
      - /var/run/docker.sock:/var/run/docker.sock:ro
      - ./traefik/traefik.yaml:/traefik.yml:ro
      - ./traefik/acme.json:/acme.json
      - ./traefik/config.yml:/config.yml:ro
      - ./traefik/logs:/var/log/traefik
This section defines volumes to mount inside the Traefik container. We mount the host's local time configuration, the Docker socket for communication with the Docker daemon, and various Traefik configuration files and directories (traefik.yaml, acme.json, config.yml, and logs). These volumes ensure that Traefik has access to necessary configurations and logs.
    labels:
      - "traefik.enable=true"
      - "traefik.http.routers.traefik.entrypoints=web"
      - "traefik.http.routers.traefik.rule=Host(`traefik-dashboard.YOUR_DOMAIN.LOCAL`)"
      ...
Lastly, we define labels for Traefik configuration. These labels are used by Traefik to route traffic and manage HTTPS certificates. Here, we enable Traefik, define routing rules for the Traefik dashboard, and configure HTTPS settings. Make sure to replace placeholders like YOUR_DOMAIN.LOCAL with your actual domain.
Traefik Dashboard and Security.
To create the Passwords for the Traefik site,if you are going to use the dashboard otherwise ignore this part, you will need to do the following.
- Update Package Lists:
sudo apt update
This command updates the package lists for all repositories configured in the system. It ensures that the system has the latest information about available software packages.
- Install Apache Utilities:
sudo apt install apache2-utils
This command installs the apache2-utils package, which includes utilities for managing Apache web server configurations. Among these utilities is htpasswd, which we'll use to generate the Basic Auth password hash.
- Generate Hashed Password:
echo $(htpasswd -nb "<USER>" "<PASSWORD>") | sed -e s/\\$/\\$\\$/g
This command generates a hashed password for Basic Authentication using the htpasswd utility.
<USER>: Replace this with your desired username.<PASSWORD>: Replace this with your desired password eg "Password1234" in plain text.
Thehtpasswd -nbcommand generates the password hash without prompting for confirmation.
Thesed -e s/\\$/\\$\\$/gcommand escapes the dollar signs in the hashed password, ensuring compatibility with Docker Compose YAML format.
- Prompt for Password (Optional):
echo $(htpasswd -nB USER) | sed -e s/\\$/\\$\\$/g
If you encounter issues with the password formatting, you can use this command to prompt for your password interactively. Replace USER with your desired username. This command generates the hashed password without echoing it to the terminal.
Once you have the hashed password, paste it into your Docker Compose YAML file in the appropriate location for Basic Authentication. For example, if you're configuring Traefik's Basic Authentication middleware, you would paste it into the traefik.http.middlewares.traefik-auth.basicauth.users section of your Docker Compose YAML file. Remember to replace <USER> with your username and <HASHED-PASSWORD> with the generated hashed password.
Now we can start our traefik container, change your location to the root of the traefik dir and run.
sudo docker compose up -dIf all goes well, you can visit the Traefik site you have built.
https://your_server_ip:8080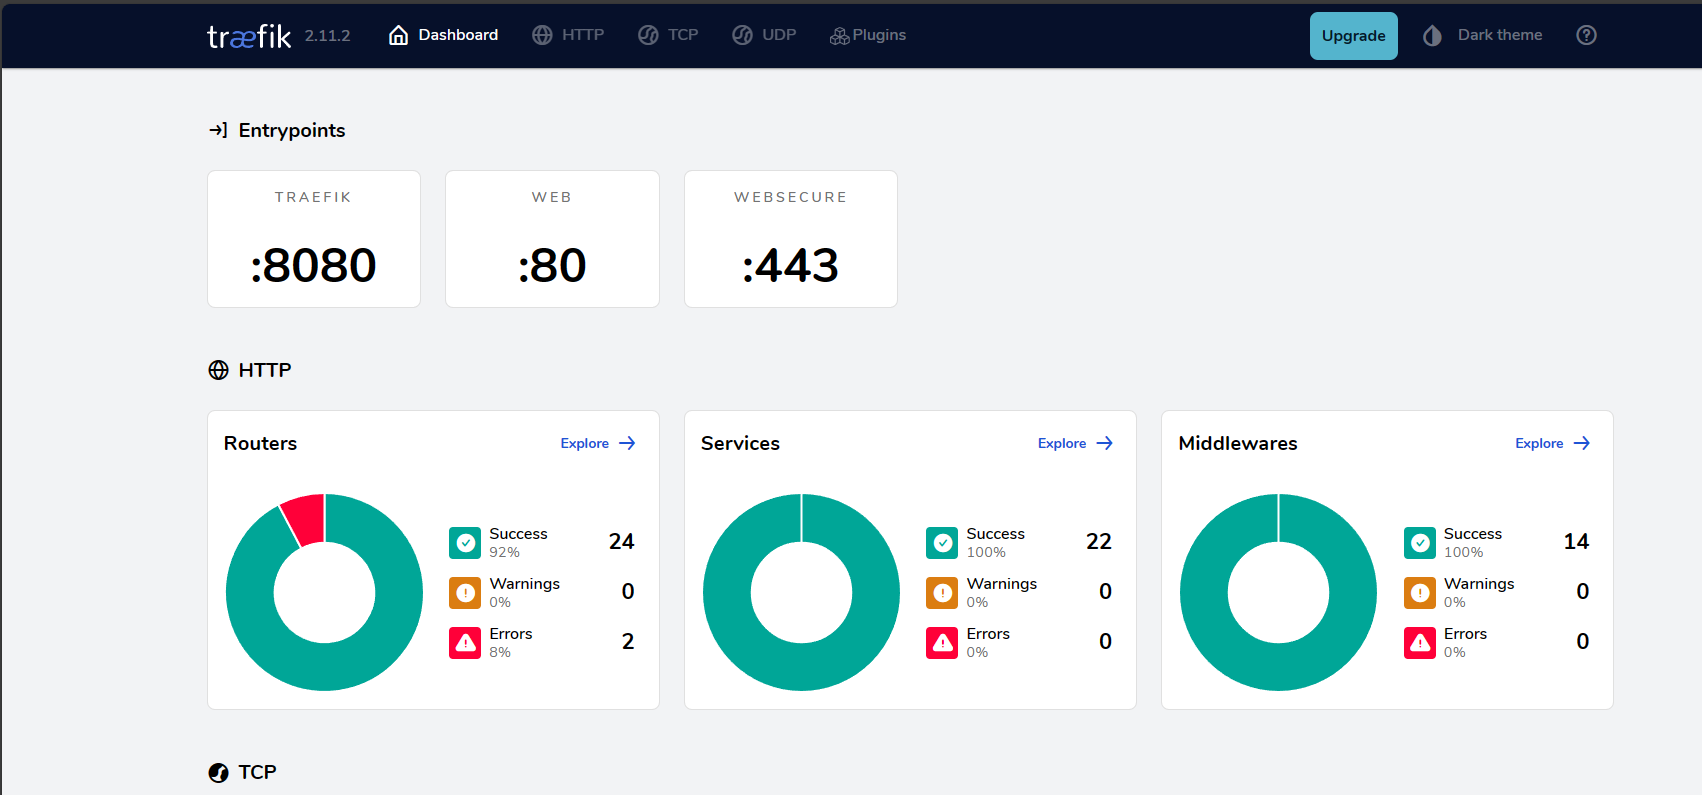
Installing an example Nginx Site.
Now, let's create an example Nginx site within a Docker container. Below is an example docker-compose.yml snippet to achieve this, add this to your nGinx docker-compose.yaml file :
  nginx:
    image: nginx:latest
    container_name: nginx
    restart: unless-stopped
    labels:
      - "traefik.enable=true"
      - "traefik.docker.network=proxy"
      - "traefik.constraint-label=proxy"
      - "traefik.http.routers.nginx-http.rule=Host(`nginx.YOUR_DOMAIN.LOCAL`)"
      - "traefik.http.routers.nginx-http.entrypoints=web"
      - "traefik.http.routers.nginx-http.middlewares=https-redirect"
      - "traefik.http.routers.nginx-https.rule=Host(`nginx.YOUR_DOMAIN.LOCAL`)"
      - "traefik.http.routers.nginx-https.entrypoints=https"
      - "traefik.http.routers.nginx-https.tls=true"
      - "traefik.http.services.nginx.loadbalancer.server.port=3001"
    networks:
      - proxy
This configuration sets up an Nginx container with Traefik routing traffic to it based on the domain NGINX.YOUR_DOMAIN.LOCAL. Make sure to replace YOUR_DOMAIN.LOCAL with your desired domain.
Let's break down the snippet for creating an example Nginx container with Traefik labels:
nginx:
  image: nginx:latest
  container_name: nginx_example
  restart: unless-stopped
This section defines the Nginx service. We specify the Nginx image (nginx:latest), set the container name to nginx_example, and configure it to restart automatically unless explicitly stopped.
  labels:
    - "traefik.enable=true"
    - "traefik.docker.network=proxy"
    - "traefik.constraint-label=proxy"
    - "traefik.http.routers.nginx-http.rule=Host(`nginx.YOUR_DOMAIN.LOCAL`)"
    - "traefik.http.routers.nginx-http.entrypoints=web"
    - "traefik.http.routers.nginx-http.middlewares=https-redirect"
    - "traefik.http.routers.nginx-https.rule=Host(`nginx.YOUR_DOMAIN.LOCAL`)"
    - "traefik.http.routers.nginx-https.entrypoints=websecure"
    - "traefik.http.routers.nginx-https.tls=true"
    - "traefik.http.services.nginx.loadbalancer.server.port=3001"
In this section, we define labels for Traefik configuration. These labels are used by Traefik to route traffic and manage HTTPS certificates for the Nginx container.
traefik.enable=true: Enables Traefik to manage this container.traefik.docker.network=proxy: Specifies the Docker network that Traefik should use for communication. Here, it's set toproxy.traefik.constraint-label=proxy: Specifies the constraint label to identify this container within Traefik's routing system.traefik.http.routers.nginx-http.rule=Host('nginx.YOUR_DOMAIN.LOCAL'): Defines the routing rule for HTTP traffic to the Nginx container. ReplaceYOUR_DOMAIN.LOCALwith your actual domain.traefik.http.routers.nginx-http.entrypoints=web: Specifies the entry point for HTTP traffic. Here, it's set toweb.traefik.http.routers.nginx-http.middlewares=https-redirect: Applies the HTTPS redirect middleware to redirect HTTP traffic to HTTPS.traefik.http.routers.nginx-https.rule=Host('nginx.YOUR_DOMAIN.LOCAL'): Defines the routing rule for HTTPS traffic to the Nginx container.traefik.http.routers.nginx-https.entrypoints=websecure: Specifies the entry point for HTTPS traffic. Here, it's set towebsecure.traefik.http.routers.nginx-https.tls=true: Enables TLS (HTTPS) termination for the Nginx container.traefik.http.services.nginx.loadbalancer.server.port=3001: Specifies the port on which the Nginx container is listening for incoming traffic. Here, it's set to port3001.
networks:
  - proxy
This section specifies the network that the Nginx container will connect to. Here, it's set to the proxy network, which was defined previously in the Docker Compose file.
The provided labels configure Traefik to manage incoming traffic for the Nginx container. They define routing rules, entry points, middleware, TLS settings, and network constraints. These labels can be reused for other containers by changing the container name (nginx) and network name (proxy) accordingly. This allows for easy setup and management of multiple services with Traefik in a Docker environment.
Launching Traefik and Nginx Containers
After configuring your docker-compose.yml file, navigate to your Docker Compose directory in your terminal and run the command:
docker-compose up -d
This command will start the Traefik and Nginx containers in detached mode, allowing them to run in the background.
Accessing Your Nginx Site:
Finaly create a DNS record on your DNS for your testing nGinx server, this record should point to the Server Hosting the Treafik service Finally, create a DNS record on your DNS for your testing nGinx server; this record should point to the Server Hosting the Treafik service, not the actual nGinx server. This is important, as the Treafik service will forward your request to the nGinx service.
Now, if you visit https://example.com:8080 in your web browser, you should see the default Nginx landing page. Traefik automatically routes traffic to the Nginx container based on the specified domain.
Following this test, you can secure all the local services you might runing in your home lab. As mentioned before, Techno Tim was added to the entries for all the standard services you might have running on your Home Lab. All you have to do is change the IP address template used.
Play around with installing these services and redirect your services to SSL.
For more blogs on Docker projects, check out my Docker Page.
Explore my other tutorials and how to here.