A Step-by-Step Guide to Installing Docker Compose on Ubuntu 22.04 LTS for Beginners.


What are docker and docker compose?
Docker is a tool that lets you create and run virtual machines like mini-computers inside your computer. Docker Compose is another tool that helps you manage multiple virtual machines simultaneously. You can use them to test your software or website in different environments.
How to install docker and docker compose?
To install docker and docker compose on your Ubuntu computer, you need to open a terminal and type some commands. Don’t worry, I will show you what to type and explain what they do. First, you need to update your system with this command:
sudo apt update && sudo apt upgrade -y
This will download the latest information about the software packages available for your system and update your system. You may be asked to enter your password to complete the process.
Next, you need to install some dependencies for docker with this command:
sudo apt install apt-transport-https ca-certificates curl gnupg lsb-release-y
This will install some tools that docker needs to work correctly. Then, you need to add docker’s official key to your system with this command:
sudo install -m 0755 -d /etc/apt/keyrings

sudo curl -fsSL https://download.docker.com/linux/ubuntu/gpg -o /etc/apt/keyrings/docker.asc

sudo chmod a+r /etc/apt/keyrings/docker.asc
This will download and verify the docker’s key, which is like a signature that proves that the docker is authentic. After that, you need to add docker’s repository to your system with this command:
echo \
  "deb [arch=$(dpkg --print-architecture) signed-by=/etc/apt/keyrings/docker.asc] https://download.docker.com/linux/ubuntu \
  $(. /etc/os-release && echo "$VERSION_CODENAME") stable" | \
  sudo tee /etc/apt/sources.list.d/docker.list
This will tell your system where to find docker’s software packages. Finally, you need to install docker with this command:
sudo apt update && sudo apt install docker-ce docker-ce-cli containerd.io -y
This will update your system again and install docker and its components.
You can find these commands on the Docker website.
Congratulations 🥳🥳, you have installed docker on your system! To check if it works, you can run these commands:
docker compose version
This will print the version of docker-compose you have installed. If you see something like “Docker Compose version v2.32.1,” docker-compose works fine.
Now we will install our first of many Docker Containers 😊.
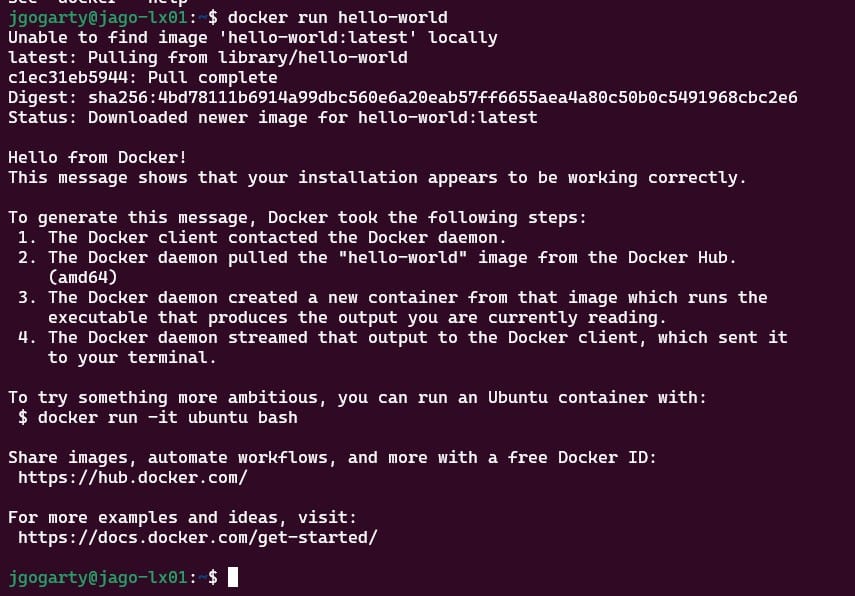
sudo docker run hello-world
This will download and run a simple virtual machine that prints “Hello from Docker!” on your terminal. If you see this message, it means docker is working fine.
The printout from the command should look like this.
Beginner TIP:
How to organize your docker compose files and folders?
When you use docker compose, you need to create some files and folders to store your configuration and data. There is no one right way to do this, but I will show you my preferred way from the mistakes I made early on, and I explain why I think it is good for beginners. Here is how I organize my files and folders:
/home/user/docker-compose
├── docker-compose.yml
├── portainer
│   ├── data
│   └── docker-compose.yml
├── Another_container
│   ├── data
│   ├── docker-compose.yml
└── .env
Let me explain what each file and folder does:
- /home/user/docker-compose: This is the main folder where I keep all my docker compose projects. You can name it whatever you want, but I like to keep it simple and clear.
- docker-compose.yml: This is the main file where I define the services that I want to run with docker compose. A service is a virtual machine that performs a specific task, such as running a web server or a database. I will show you what this file looks like later.
- Portainer: This is a folder where I keep the files and folders related to Portainer, software that helps me visualize and manage my Docker containers. A container is an instance of a virtual machine running on your system. Portainer is very useful for beginners, as it lets you see what is happening with your containers and perform actions on them with a graphical interface. I will show you how to install and use Portainer later.
- portainer/data: This is a folder where Portainer stores its data, such as settings and logs. You don’t need to worry about this folder, as Portainer will create and manage it for you.
- portainer/docker-compose.yml: This is a file where I define the service for Portainer. I will show you what this file looks like later.
- .env: This is a file where I store some environment variables, which are like settings that affect how docker and docker compose work. I will show you what this file looks like later, but in short, this is where you will store your secrets, such as passwords and usernames.
I think this way of organizing your files and folders is good for beginners because:
- It keeps your projects separate and easy to find. You can have as many folders as you want, each with its own docker-compose.yml file and data folder. This way, you can start and stop each project independently and avoid conflicts or confusion.
- Your main docker-compose.yml file simple and clean. You can use this file to define the services that you want to run on your system, and link them together with networks and volumes. Networks are like virtual cables that connect your containers, and volumes are like virtual disks that store your data. I will show you how to use them later.
- Environment variables are in one place and are valueseasy to change. You can use this file to store some values that you don’t want to type every time, such as passwords or ports. You can also use this file to change some settings that affect how docker and docker compose work, such as the version or the network name. I will show you how to use them later.
What are the next steps?
describedIn the next few blog posts, I will show you how to use docker and docker-compose to install and run Portainer. I will also explain how to use the files and folders that I have explained above and how to customize your container.

For even more project ideas, visit my Docker Page.
Explore my other tutorials and how to here.