Setting Up a Home Lab: A Beginner's Guide for IT Professionals.


In today's ever-evolving IT landscape, a home lab has become an essential tool for professionals and students. Whether you’re an aspiring IT enthusiast or a seasoned professional looking to expand your skills, building a home lab is a cost-effective way to experiment with new technologies, learn about system administration, and prepare for certifications.
Starting a home lab doesn't have to be expensive or require enterprise-level equipment. You can begin your home lab with a Raspberry Pi or a personal computer.
This guide will cover everything you need to know to set up a functional home lab, from selecting hardware to configuring software. By the end, you’ll understand how to start this rewarding journey.
Why Set Up a Home Lab?
A home lab provides an isolated environment where you can:
- Learn and Experiment: Test new operating systems, software, and networking setups without risking production systems.
- Gain Hands-On Experience: Build practical IT skills like virtualization, server management, and network configuration.
- Prepare for Certifications: Practice scenarios for exams like CompTIA, Cisco, and VMware.
- Stay Ahead: Explore emerging technologies such as containers, automation tools, and advanced networking.
Step-by-Step Guide to Setting Up Your Home Lab
1. Define Your Goals
Before starting, identify your primary objective:
- Are you practising for certifications?
- Do you want to learn about virtualization or cloud technologies?
- Are you experimenting with network setups or cybersecurity tools?
Your goals will dictate the hardware and software you require. I work in tech support, where I interact with virtualized servers daily. I wanted to create an environment where I could build, break, and test virtual machines (VMs) while also setting up a network around them.
2. Choose Your Hardware
The hardware is the foundation of your home lab. You can start small and upgrade as your needs grow.
- Essential Components:
- Server or Desktop: Server or Desktop: You don't need to use used or refurbished servers like Dell PowerEdge or HP ProLiant to start a home lab. If you're on a budget, a mid-range desktop can be a great option. Alternatively, you can buy a single-board computer, such as a Raspberry Pi or Zimba Board, for around $100. With these boards, you can create and experiment with hundreds of projects.
- Storage: A home lab doesn't necessarily need enterprise-grade storage. You can start with a 250 GB SSD. Crucial is a reputable brand in the market, offering competitive prices, especially on last-generation products. I also recommend purchasing different types of storage so that you can understand the various types and their specific use cases.
- SATA M.2 SSD,
- NVMe M.2 SSD
- 2.5 inch SATA SSD, and
- 2.5 and 3.5 Hard Drives.
- Networking Equipment: Routers, switches, and network cables are essential for creating local networks in your homelab. I recommend using Unifi products for firewalls and switches, as they offer many features applicable to a production environment, including VLANs, rule-based access, and content filtering. Their Ultra and Lite ranges are perfect for beginners.
Budget Tip:
Search for second-hand equipment on platforms like eBay or local IT refurbishes.
3. Choose Your Virtualization Platform
Virtualization is an essential component for many home labs, enabling the operation of multiple operating systems on a single piece of hardware. Depending on your specific hardware configuration, you can begin with a minimum of 16 GB of RAM and a mid-range processor with at least six cores to run any of the options listed below.
- Popular Options:
- Proxmox VE: is free and open-source, making it ideal for beginners. It can run on most hardware, including a Zimba Board, and is a good alternative for learning virtualization.
- VMware Workstation/ESXi: Industry-standard virtualization tools with robust features. Personal-use versions are free, and educational licenses are available through programs like Broadcom's VMware Cloud Foundation initiative.
- Hyper-V: Integrated into Windows, excellent for Microsoft-focused labs.
4. Configure Your Networkhands-on
Networking is the backbone of IT infrastructure, and setting up your first home lab offers a fantastic opportunity to learn and experiment with it hands-on. If you’re new to networking, don’t worry! This section will guide you step-by-step, explaining key concepts and providing practical advice to help you get started.
What is Networking in a Home Lab?
At its core, networking in a home lab involves connecting your devices (computers, servers, and other hardware) so they can communicate with each other. This includes managing data flow, ensuring security, and testing how systems behave under different configurations. Mastering networking concepts will help you understand real-world IT environments and troubleshoot issues effectively.
4. Configure Your Network
Networking is a critical component of IT, and your home lab is an excellent place to learn it hands-on.
Networking Basics for Beginners:
- LAN (Local Area Network): Connect devices within your home for local communication.
- IP Addresses: Assign static IPs to simplify management.
- VLANs (Virtual LANs): Segregate network traffic for better organization and security.
- Example: Use VLAN 1 for IoT devices, VLAN 2 for general testing, and VLAN 3 for your home lab.
Networking Tools to Explore:
- Firewalls: Use a tool like pfSense or OPNsense to monitor and control traffic.
- Wireshark: Analyze network traffic and protocols in real time.
- GNS3 or Cisco Packet Tracer: Simulate network setups and configurations.
Tools to Help You Learn Networking
- Wireshark: A network protocol analyzer that helps you see what’s happening on your network.
- Netcat: A tool for testing and debugging network connections.
- GNS3 or Cisco Packet Tracer: Networking simulators to practice configurations before implementing them in your lab.
Tips for Success
- Start Small: Begin with a simple setup like connecting two devices and gradually add complexity.
- Document Everything: Realy, Record your configurations, changes, and results.
- Use Online Resources: Platforms like YouTube, blogs, and forums contain tutorials and troubleshooting advice.
5. Install and Configure Software
Once you have your home lab hardware and network set up, the next step is to install and configure the software that powers your environment. This is where your lab truly comes to life, allowing you to run experiments, simulate real-world IT scenarios, and practice essential skills.
Operating Systems
Operating systems (OS) are the foundation of your lab. Depending on your goals, you may need to install OSs on physical hardware or virtual machines.
Linux
- Linux is widely used in servers and IT infrastructure due to its stability and flexibility.
- Many popular distributions are free and well-documented, making them ideal for learning. I would recommend the following OSs to build the web server using Apache or Nginx, Learn shell scripting and system administration commands, and Experiment with package managers like APT (Debian/Ubuntu) or YUM/DNF (CentOS/AlmaLinux).
- Ubuntu: User-friendly and perfect for beginners,
- CentOS/AlmaLinux: Often used in enterprise environments.
- Debian: Known for stability and server applications.
Windows Server
- It's commonly used in production and enterprise environments and will be your go-to for managing user accounts, domains, and applications.
- Under evaluation licensing, you can install a free trial version of Windows Server to explore for up to a year. This allows you to build and learn about Active Directory, DNS, DHCP, and Group Policy Management.
- Practice setting up file shares and permissions.
Pro Tip:
- If you use Windows as your primary system, enable Hyper-V (Windows’ built-in virtualization tool) to create and manage virtual machines.
Here is an image of my small and humble home lab, demonstrating that it doesn't take a fortune to get started.
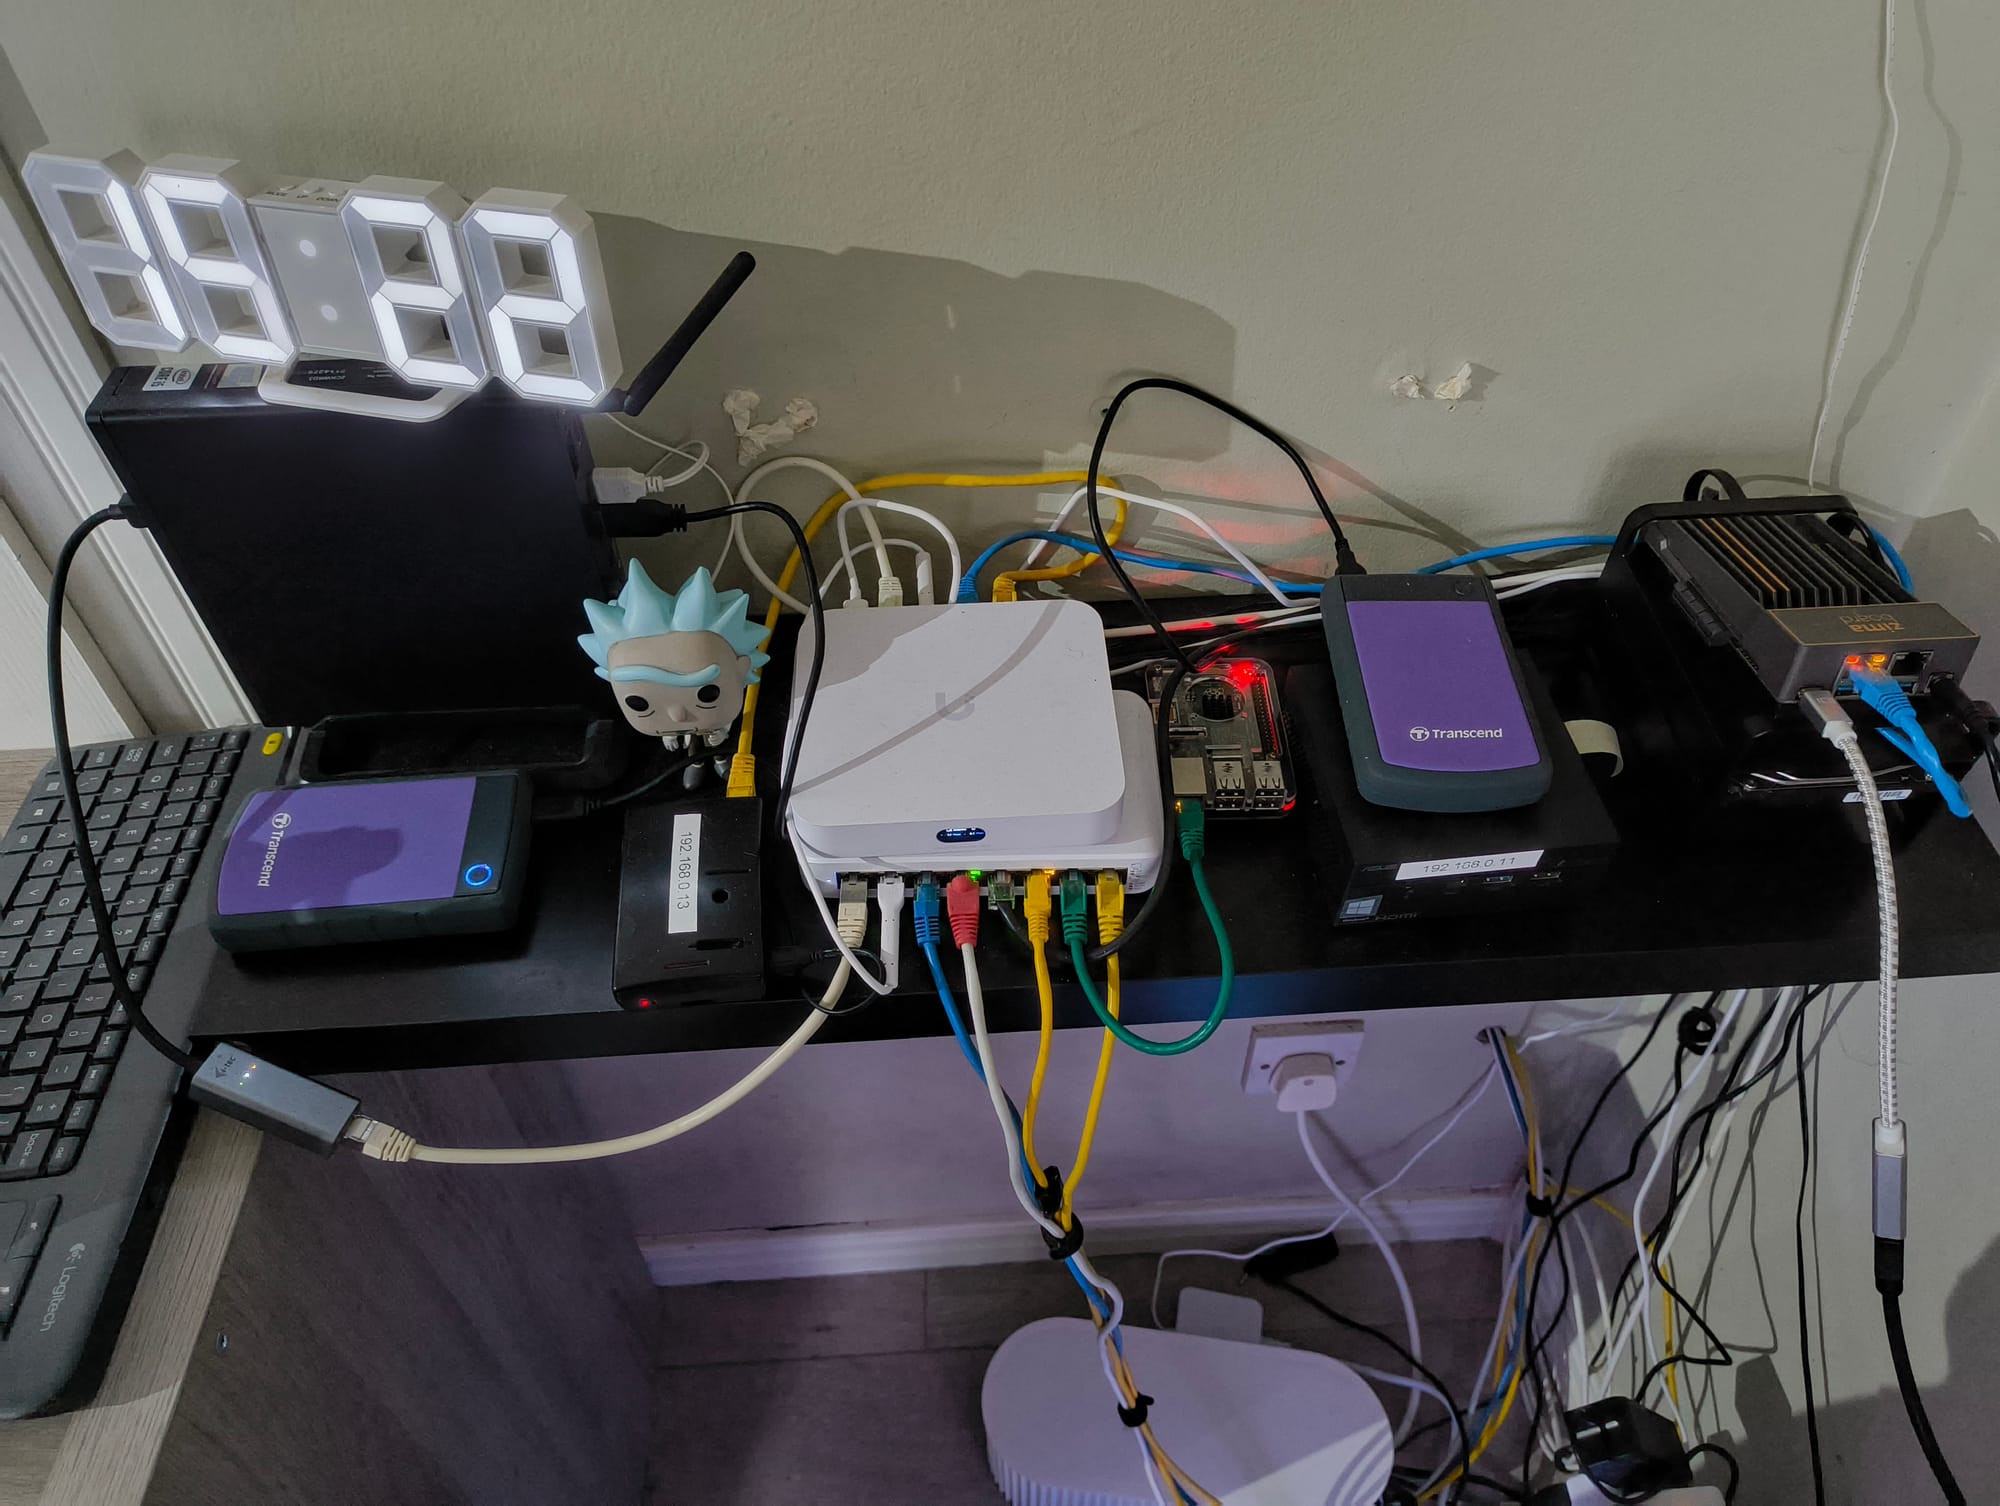
So from Left to Right,
1, A dell Micro 3080 with
- Intel Core i5 10th Gen CPU with 12 cores
- 32 GB DDR4 RAM
- 500 GB SATA SSD, internal
- 250 GB NVMe drive, Internal
- 4tb External HHD
2, Raspberry Pi with PiHole DNS installed,
3, Unifi Gateway, and Unifi 8 Port POE switch
4, Another Raspberry Pi with Pihole DNS as a secondary DNS
5, Asus Mini PC I use for Docker and Samba mainly, and testing
- Intel(R) Celeron(R) N4000 CPU @ 1.10GHz, 2 cores
- 16 GB DDR4 RAM
- 500 GB SATA SSD, internal
- 250 GB NVMe drive, Internal
- 4tb External HHD
6, I recently added the Zimba Board 232 to my collection. I'm currently using it as a Plex Media Server with a 4TB Western Digital SATA drive attached. I'm pleased with the performance of this board, and I will share more updates once I fine-tune the settings and explore its capabilities further.


Setting up a home lab is a rewarding investment for anyone in IT. With the right hardware, software, and configuration, you can create a robust learning environment that helps you stay ahead in your career. Start small, learn as you go, and expand your setup as your knowledge and confidence grow.
For more IT tutorials and insights, explore the latest articles on JimGogarty.com.
FAQs About Home Labs
1. What is a home lab?
A home lab is a personal IT environment where you can experiment, learn, and practice IT skills without risking production systems.
2. How much does it cost to set up a home lab?
Costs vary depending on your goals. A basic setup can cost as little as €500, while advanced configurations with enterprise-grade hardware can run into thousands.
3. What is the best hardware for a home lab?
Refurbished servers like Dell PowerEdge, affordable desktops, or even Raspberry Pi devices are great starting points.
4. Can I use my home lab for certifications?
Absolutely! Many professionals use home labs to prepare for certifications like CompTIA, Cisco CCNA, and VMware VCP.
FAQs About JimGogarty.com
1. What is JimGogarty.com?
JimGogarty.com is a blog dedicated to IT professionals and enthusiasts. It provides tutorials, insights, and reviews on IT support, cybersecurity, hardware, home labs, and more.
2. Who is the target audience for JimGogarty.com?
The blog is designed for IT professionals, students, home lab enthusiasts, and anyone interested in technology.
3. How often is content published on JimGogarty.com?
New blogs are published weekly, with a focus on timely and valuable IT topics.
4. Does JimGogarty.com offer any services?
Currently, the site focuses on providing educational content, but it aims to support IT professionals through guides, reviews, and tutorials.
5. How can I contact JimGogarty.com?
Visit the Contact Us page on the website to send queries or collaboration requests.


