How to Install and Configure Secure FTP in Your Home Lab or Production Environment
Setting up a secure FTP server is an essential skill for anyone starting out in tech.


Setting up a secure FTP server is an essential skill for anyone starting out in tech or exploring the world of system administration. While many tutorials provide a quick guide, they overlook best practices, such as separating private keys and certificates—a critical aspect of securing your server in production environments.
In this guide, I'll walk you through installing and configuring a secure FTP server on Ubuntu using FTPS with TLS encryption and public/private key authentication. Whether you’re an IT enthusiast building a home lab or a new tech professional, this tutorial will help you set up a secure file transfer environment the right way.
This blog is part of a series of projects built on Unbuntu; check out my other blogs below

Why Secure FTP?
FTP is a widely used protocol for transferring files, but by default, it sends data (including passwords) in plain text. This makes it highly vulnerable to interception and attacks. By using FTPS (FTP Secure) or SFTP (Secure File Transfer Protocol), we can:
- Encrypt Data in Transit: Prevent unauthorized interception of sensitive information.
- Authenticate Users Securely: Ensure only trusted users have access.
- Align with Best Practices: Meet modern cybersecurity standards for file transfers.
Step 1: Install vsftpd on Your Server
vsftpd (Very Secure FTP Daemon) is one of the most secure and fast FTP servers for Linux.
1. Update Your System
Start by updating your Ubuntu server:
sudo apt update && sudo apt upgrade -y
2. Install vsftpd
sudo apt install vsftpd -y
3. Backup the Default Configuration
Before making changes, always create a backup, its a good idea to have a clean copy before you start.
sudo cp /etc/vsftpd.conf /etc/vsftpd.conf.bak
Step 2: Set Up SSL/TLS Encryption for Secure FTP
To encrypt FTP traffic, we need an SSL/TLS certificate. Instead of combining the key and cert in one .pem file (which is insecure), we’ll generate them separately.
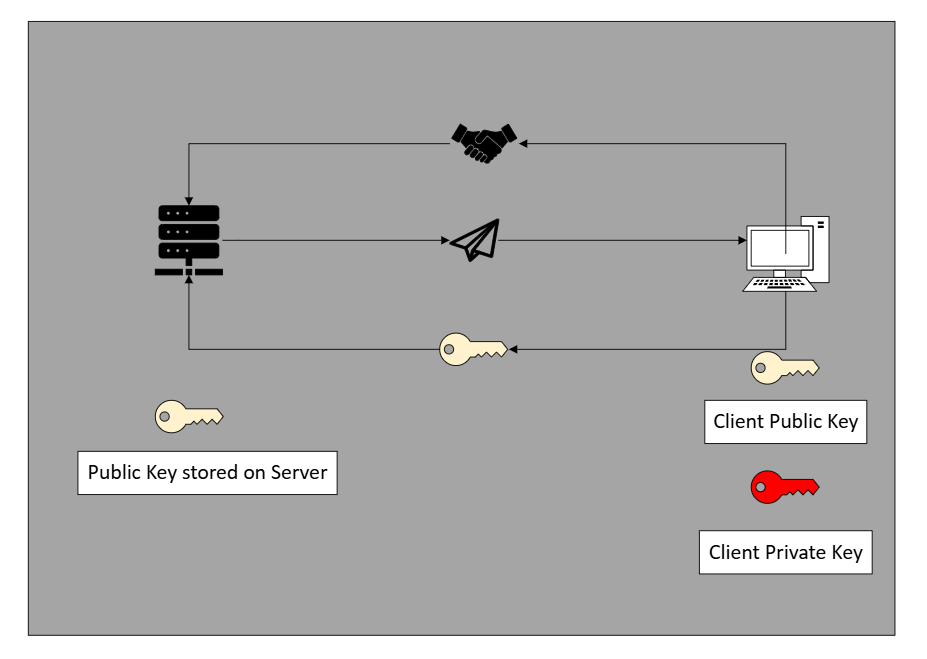
How the Private Key and Certificate Are Used in FTP Connections
When setting up a secure FTP connection using FTPS (FTP Secure), the SSL certificate and private key establish encrypted communication between the client and server.
During an SFTP (Secure File Transfer Protocol) connection, key exchange (session key generation) is critical to ensure secure communication between the client and server. When an SFTP connection is initiated, the client and server first negotiate and agree on a key exchange algorithm, such as Diffie-Hellman (DH) or Elliptic Curve Diffie-Hellman (ECDH). This process enables both parties to derive a shared session key without actually transmitting it over the network, preventing attackers from intercepting it. The session key is then used for symmetric encryption, meaning both the client and server will use the same key to encrypt and decrypt data. This exchange also establishes the encryption algorithm (e.g., AES, ChaCha20) and hash functions for data integrity. Since the session key is unique for each connection and regenerated periodically during long sessions, it ensures confidentiality, data integrity, and protection against man-in-the-middle (MITM) attacks throughout the SFTP session.
be used
Bonus Tips: Why Combining the Private Key and Certificate is Insecure
From a cybersecurity perspective, combining the private key and SSL certificate into a single .pem file poses a significant security risk. The private key is the most sensitive part of an encryption setup—it is used to decrypt traffic and authenticate the server. If an attacker gains access to a .pem private key and certificate file, they can impersonate the server, decrypt encrypted data, and intercept sensitive communications. In a secure production environment, best practices dictate that the private key should be stored separately from the certificate, with strict access controls. This prevents unauthorised access, reduces the risk of credential leaks, and aligns with industry standards like PCI-DSS and NIST guidelines for secure encryption practices. Separating the key also makes key rotation and certificate renewal more manageable, reducing downtime and improving security hygiene.
1. Generate a Private Key and SSL Certificate
Run the following command on your FTP server:
sudo openssl req -x509 -nodes -days 365 -newkey rsa:2048 \
-keyout /etc/ssl/private/vsftpd.key \
-out /etc/ssl/private/vsftpd.crt
Press Enter to accept the defaults or customise the certificate details.
This cert and key encrypt data between you and the server when you upload or download files.
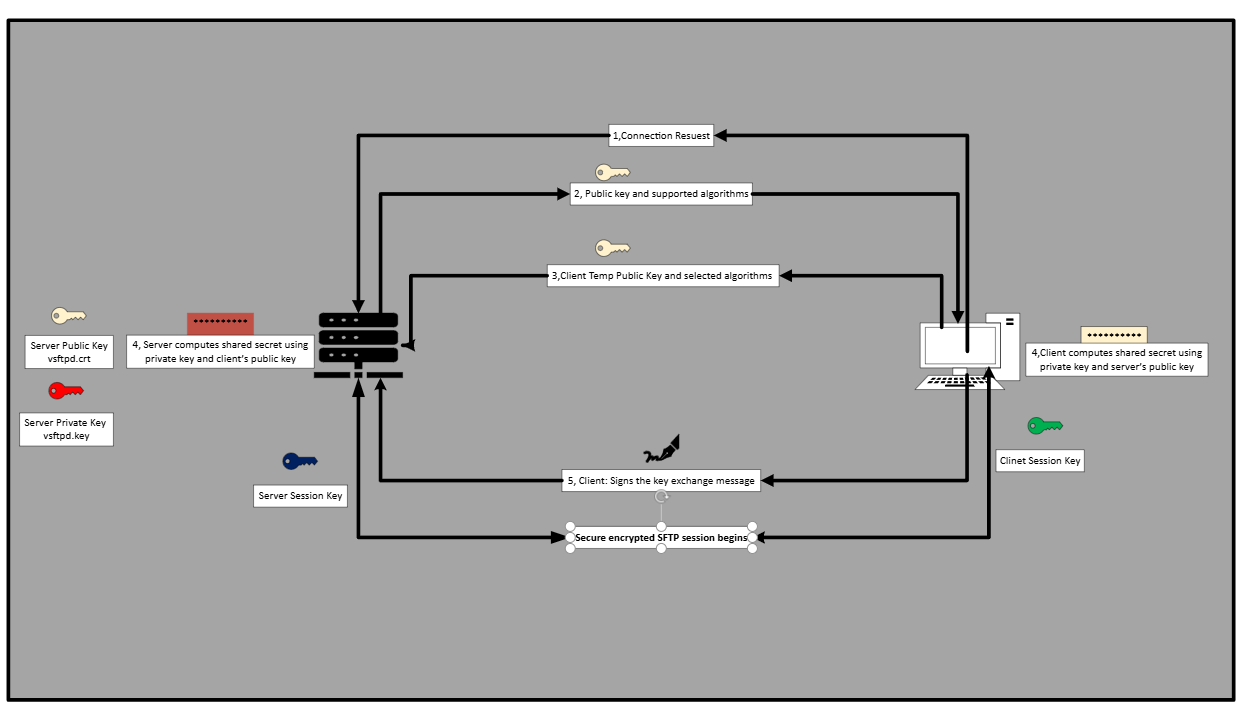
During the SFTP connection process, the client first requests a connection to the server, agreeing to use SSH as the underlying secure communication protocol. In response, the server sends a set of cryptographic parameters, including supported key exchange algorithms (e.g., Diffie-Hellman, ECDH), encryption algorithms (e.g., AES, ChaCha20), MAC algorithms (e.g., HMAC-SHA256), and the public key for authentication. The client selects the most suitable key exchange algorithm from the list, generates a temporary public key, and sends it to the server.
Using this, the server computes a shared secret by combining its private key with the client's public key, ensuring that the shared secret is never transmitted over the network. Similarly, the client computes the shared secret using its private and server keys, allowing both parties to derive the same session key independently. To confirm authenticity and prevent man-in-the-middle (MITM) attacks, the server signs the key exchange message with its private host key, and the client verifies it using the server’s public key. Once verified, the session key is established, and it is used to encrypt and decrypt all data exchanged during the session. The agreed-upon encryption algorithm (e.g., AES, ChaCha20) ensures that all communication remains secure. Finally, with the session key in place, encrypted communication begins, and all subsequent commands, authentication data, and file transfers are protected, maintaining the integrity and confidentiality of the SFTP session.
Step 3: Configure vsftpd for Security
Now, let’s edit the vsftpd configuration file.
1. Open vsftpd.conf
sudo nano /etc/vsftpd.conf
2. Apply Secure Settings
Find and modify/add these settings:
# Example config file /etc/vsftpd.conf
#
# Updated and tidied for security best practices.

# Run standalone? vsftpd can run either from an inetd or as a standalone daemon.
listen=NO
listen_ipv6=YES

# Disable anonymous FTP for security.
anonymous_enable=NO

# Allow local users to log in.
local_enable=YES

# Enable write commands for local users.
write_enable=YES

# Set secure file permissions for uploaded files.
local_umask=022

# Display directory messages.
dirmessage_enable=YES

# Use local time for timestamps.
use_localtime=YES

# Activate logging of uploads/downloads.
xferlog_enable=YES
xferlog_file=/var/log/vsftpd.log
xferlog_std_format=YES

# Ensure PORT transfer connections originate from port 20.
connect_from_port_20=YES

# Restrict local users to their home directories.
chroot_local_user=YES
allow_writeable_chroot=YES

# Enable secure SSL/TLS connections.
ssl_enable=YES
rsa_cert_file=/etc/ssl/private/vsftpd.crt
rsa_private_key_file=/etc/ssl/private/vsftpd.key
allow_anon_ssl=NO
force_local_data_ssl=YES
force_local_logins_ssl=YES

# Specify supported SSL protocols and ciphers.
ssl_tlsv1=YES
ssl_sslv2=NO
ssl_sslv3=NO
require_ssl_reuse=NO
ssl_ciphers=HIGH

# Configure passive mode ports.
pasv_min_port=40000
pasv_max_port=50000

# Directory for secure chroot jail.
secure_chroot_dir=/var/run/vsftpd/empty

# Specify the PAM service to use.
pam_service_name=vsftpd

# Additional optional settings for security.
idle_session_timeout=300
data_connection_timeout=120

# Uncomment to enable UTF-8 support for file systems.
utf8_filesystem=YES

# Customize the login banner.
ftpd_banner=Welcome to a secure FTP server.
3. Restart vsftpd
sudo systemctl restart vsftpd
Step 4: Create a User for Secure FTP Access
To transfer files securely, we must create an FTP user login to the server. We will use a public-private key with a password to connect to our servers.
- Create an FTP User
sudo adduser ftpuser
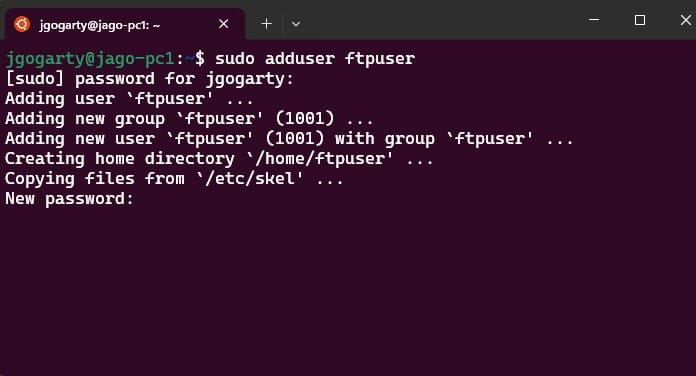
Set a strong password when prompted.
2. Set File Permissions
sudo chown -R ftpuser:ftpuser /home/ftpuser
sudo chmod -R 755 /home/ftpuser
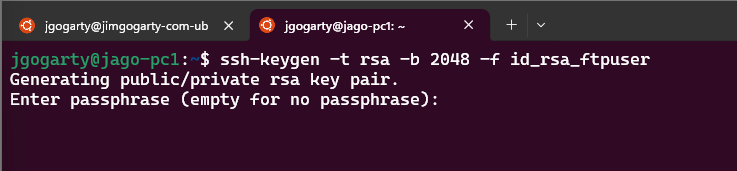
Step 5: Configure Public/Private Key Authentication for SFTP
We’ll use SSH public/private key authentication for better security to login to the sftp server.
1. Generate an SSH Key Pair (On Your Local Machine)
ssh-keygen -t rsa -b 2048 -f id_rsa_ftpuser
When prompted, add a password to the key
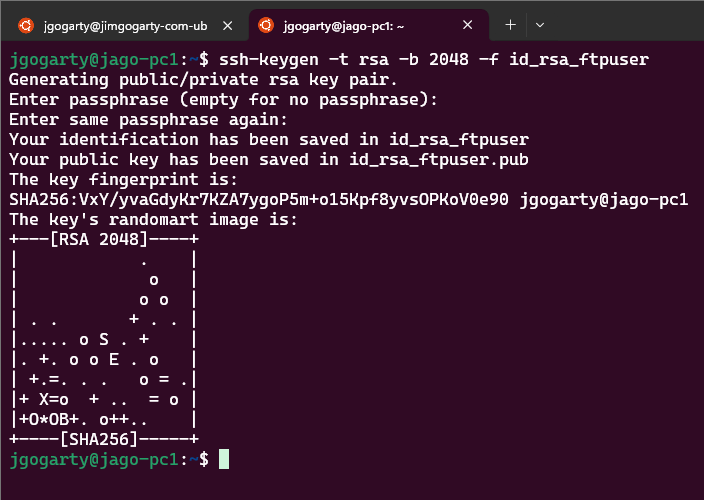
Don't worry; I will be deleting these keys after this tutorial. 😄
This creates:
- Private key:
id_rsa_ftpuser - Public key:
id_rsa_ftpuser.pub
2. Transfer the Keys to the FTP Server
Run the following command from your local machine to move the Public Key to your server.
scp id_rsa_ftpuser.pub ftpuser@<server_ip>:~/
Then, on the server:
mkdir -p ~/.ssh
mv id_rsa_ftpuser.pub ~/.ssh/authorized_keys
chmod 700 ~/.ssh
chmod 600 ~/.ssh/authorized_keys
Secure Authentication Process in SSH Using Public-Private Key Encryption
When an SSH connection is initiated using a public-private key pair, the client sends a connection request to the server with a public key. The server then checks its list of authorized public keys to see if the client's public key is recognized. If a matching public key is found, the server generates a challenge message, encrypts it with the stored public key, and sends it to the client. The client, possessing the corresponding private key, decrypts the challenge and returns the decrypted response to the server as proof of identity. If the response is correct, the server grants access, establishing a secure SSH session. No passwords are exchanged throughout this example, but I would always recommend adding an extra layer of scrutiny; the authentication remains protected by asymmetric encryption. Once authenticated, the client and server establish an encrypted communication channel, allowing for secure remote access, command execution, and file transfers.
Step 6: Connect Using FileZilla with Public/Private Keys
1. Convert the Private Key to PPK Format
- Open PuTTYgen.
- Click Load, select
id_rsa_ftpuser, and save asid_rsa_ftpuser.ppk.
2. Configure FileZilla
- Open FileZilla Site Manager (
Ctrl + S). - Click New Site and name it.
- Protocol: Select SFTP - SSH File Transfer Protocol.
- Host: Enter your server IP.
- Logon Type: Select Key file.
- User: Enter
ftpuser. - Key File: Select
id_rsa_ftpuser.ppk.
Click Connect to test the setup.
Setting up a secure FTP server is easy when you follow best practices. Always separate private keys and certificates, enforce TLS encryption, and use public/private key authentication for better security. If you’re setting up a home lab or production server, follow these steps to ensure safe and efficient file transfers.
Got questions? Drop them in the comments or visit jimgogarty.com for more IT security guides! 🚀

FAQs: FTP Setup on Linux
1. What’s the difference between FTP, FTPS, and SFTP?
- FTP: Unencrypted file transfer (not recommended).
- FTPS: FTP with SSL/TLS encryption for security.
- SFTP: Secure file transfer via SSH (better alternative).
2. Why is my FTP connection failing?
Check:
- Server firewall settings (
sudo ufw allow 21/tcp). - Correct username and password.
- Correct SSL certificate paths in
vsftpd.conf.
3. How can I change the FTP user’s home directory?
usermod -d /your/custom/directory ftpuser
4. How do I list FTP users on my server?
cat /etc/passwd | grep ftp
FAQs: jimgogarty.com as a Business
1. What services does Jim Gogarty offer?
JimGogarty.com specializes in IT consulting, cybersecurity training, and Linux server management.
2. Does Jim Gogarty provide one-on-one tech guidance?
Yes! Whether you're an enthusiast or starting out in IT, I provide personalized mentorship.
3. Can I get custom security audits for my FTP server?
Absolutely. Contact me via jimgogarty.com for security audits and FTP hardening.


