Installing Proxmox on a Dell OptiPlex 3080 Micro — A Home Lab Guide

The Dell OptiPlex 3080 Micro is one of the best value home lab hosts you can buy second-hand. It is compact, quiet, energy-efficient, and packs enough CPU and RAM headroom to run a serious stack of virtual machines and containers. I picked mine up from CEX for €200, and it has become the foundation of a home lab running backups, media, and a range of self-hosted services.
This guide walks through installing Proxmox VE on the 3080 Micro from scratch, including storage layout, network configuration, and the first steps to get Intel Quick Sync hardware transcoding working — something that makes this machine genuinely useful for a Plex server alongside its other roles.
Why Proxmox and Not VMware?
VMware ESXi is the name that comes up most often when people start researching home lab hypervisors, and for good reason — it is industry-standard, well-documented, and widely used in enterprise environments. I initially considered it, but ran into a fundamental problem before even getting started: the onboard NIC in the Dell 3080 Micro is a **Realtek PCIe GbE controller** (RTL8169 family), and VMware dropped native Realtek support entirely from ESXi 7.0 onwards. Without hunting down community-built driver packages and injecting them into a custom ESXi installer image, the machine has no network connectivity, making the hypervisor management interface unreachable. That is a significant amount of friction before you have done anything useful. USB-to-Ethernet adapters, which I wanted to use for a dedicated backup network, fare even worse under ESXi.
Proxmox VE, built on Debian Linux, inherits the Linux kernel's broad hardware support. It recognised the Realtek NIC, both USB Ethernet adapters, and every other device in the machine immediately, with no additional drivers required. Beyond hardware compatibility, Proxmox offers everything a home lab needs at no cost: full KVM virtualisation, LXC containers, ZFS support, and a clean browser-based management interface. VMware's free ESXi tier also removed the vSphere client in later versions, further complicating management. For a home lab built on second-hand consumer hardware, Proxmox is simply the more practical choice — and in this case, the only realistic one without significant extra effort.
Hardware Overview
| Component | Spec |
|---|---|
| CPU | Intel Core i5-10500T (10th Gen, 6c / 12t) |
| RAM | 16 GB DDR4 |
| Storage (NVMe) | 250 GB NVMe SSD |
| Storage (SATA) | 500 GB SATA SSD |
| Network | 1× Realtek PCIe GbE (RTL8169) |
| Form Factor | Micro/SFF desktop |
A note on the CPU: the i5 10th Gen in this machine is listed as "12 cores" in some specs, but it is actually 6 physical cores with Hyper-Threading giving 12 logical threads. It also supports Intel Quick Sync Video, which allows hardware-accelerated transcoding in Plex — a significant advantage over cheaper ARM-based alternatives.
Recommended upgrades before you start:
- Minimum 16 GB DDR4 RAM (DDR4 SO-DIMMs are inexpensive). The more RAM, the more VMs you can run simultaneously.
- A 500 GB NVMe is fine for the OS and fast VM disks. If you have a spare SATA SSD (500 GB or larger), add it for secondary storage.
Prerequisites
Before you begin, you will need:
- A USB drive of at least 8 GB (it will be wiped)
- The Proxmox VE ISO — download from proxmox.com/downloads
- Rufus (Windows) or balenaEtcher (cross-platform) to write the ISO
- A monitor and keyboard connected to the Dell for the initial install only
- A second computer to access the Proxmox web interface after installation
Step 1 — Create a Bootable USB Drive
- Download the latest Proxmox VE ISO from the Proxmox website. At the time of writing, this is Proxmox VE 8.x.
- Open Rufus and select your USB drive.
- Under Boot Selection, click Select and choose the Proxmox ISO.
- Set Partition Scheme to GPT (the 3080 uses UEFI).
- Click Start. When Rufus asks about write mode, choose DD Image mode — this is more reliable for Linux-based installers.
- Wait for the process to finish.
Warning: Rufus will erase everything on the USB drive. Double-check you have selected the right device before clicking Start.
Step 2 — Configure the BIOS
Power on the Dell and press F2 repeatedly during the Dell logo screen to enter the BIOS setup.
Make the following changes:
Boot settings
- Navigate to Boot → Boot Sequence.
- Set your USB drive as the first boot device.
Virtualisation
- Navigate to Advanced → Virtualisation Support.
- Ensure Intel Virtualisation Technology (VT-x) is Enabled. Without this, Proxmox VMs will not run at full speed, and some container features will be unavailable.
- If present, also enable VT-d (IOMMU) — this is needed later if you want to pass hardware devices (like the GPU) into VMs or containers.
Save and exit — the machine will reboot from your USB drive.
Step 3 — Install Proxmox VE
When the Proxmox installer menu appears, select Install Proxmox VE and press Enter.
Work through the wizard as follows:
License agreement — Accept the EULA to continue.
Target disk — Select your NVMe drive as the installation target. Leave the SATA SSD untouched for now; you will configure it separately inside Proxmox as a second storage pool.
Before confirming, click the Options button on the disk selection screen. This lets you control how Proxmox splits the NVMe between its two default storage areas:
- maxroot — the size of the `local` storage, used for ISO images, CT templates, and VZDump backups- The remainder becomes `local-lvm`, a thin-provisioned pool used for VM and container disk images
For this build, I set `maxroot` to 50 GB, leaving the rest of the NVMe for `local-lvm`. ISO images and backups don't need much space, especially once I a NAS later — but VM and container disks can grow quickly, so giving them the bulk of the fast NVMe storage makes sense.
If you leave Options untouched, Proxmox will split the disk automatically, which often gives more space to `local` than you actually need.
Country, time zone and keyboard — Set these to match your location.
Root password and email — Set a strong root password. The email address is used for system alerts — use a real address you check.
Network configuration
- Hostname: something like
pve1-host1.local - IP address: Choose a static IP on your LAN that won't conflict with DHCP. For example:
172.16.17.200/24 - Gateway: your router's IP (e.g.
172.16.17.1) - DNS server: your router or a public resolver like
1.1.1.1
Review the summary screen, then click Install. The process takes around 5–10 minutes. When it completes, remove the USB drive and let the machine reboot.
Step 4 — First Login
From any computer on your network, open a browser and go to:
https://172.16.17.200:8006
You will see a certificate warning — this is expected for a self-signed certificate. Proceed past it.
Log in with:
- Username:
root - Realm:
Linux PAM standard authentication - Password: the one you set during installation
You will also see a notice about no valid subscription — this is normal for the free community edition. Click OK to dismiss it.
Step 5 — Configure Storage
This is where most guides stop short. A proper storage layout makes a significant difference to how well Proxmox performs in a home lab. Here is what to set up on the 3080 Micro.
What you have by default
After installation, Proxmox creates:
local— a directory on the NVMe, used for ISO images, CT templates, and backupslocal-lvm— an LVM-Thin pool on the remaining NVMe space, used for VM and CT disk images
This is fine as a starting point, but if you have a second SATA SSD, you should add it as a separate LVM-Thin pool. This gives you more room for VM disks and keeps the NVMe free for the fastest workloads.
Good candidates for NVMe (local-lvm):
- Veeam CE or any backup server — backup jobs generate heavy sequential I/O and benefit from fast write speeds, especially when multiple jobs run simultaneously
- Plex LXC — Plex stores its metadata, artwork and database on the container disk; fast storage keeps library scans and the web UI snappy
- Databases — any VM running MySQL, PostgreSQL, or similar will show a noticeable difference on NVMe due to random read/write patterns
- Your most frequently used VMs — anything you boot daily and interact with regularly
Good candidates for SATA SSD (sata-thin):
- Docker host VMs — containers like Sonarr, Radarr, Prowlarr and Overseerr are not particularly I/O intensive; a SATA SSD is more than fast enough
- Lightweight service LXCs — Pi-hole, Uptime Kuma, Vaultwarden, and similar tools do very little disk I/O and will run fine on SATA
- ISO and template storage — you read these infrequently, so NVMe speed is wasted here
- Development or test VMs — machines you spin up occasionally rather than run continuously
Adding the SATA SSD as a second storage pool
Open the Proxmox node shell (your node → Shell in the top right) and run:
lsblk
Identify your SATA SSD — it will typically appear as /dev/sdb. Confirm it is the right device by checking the size.
Then run these commands to initialise it and create an LVM-Thin pool:
pvcreate /dev/sdb
vgcreate sata-vg /dev/sdb
lvcreate -l 95%FREE -T sata-vg/sata-thin
Now register it in the Proxmox GUI:
- Go to Datacenter → Storage → Add → LVM-Thin
- Fill in:
- ID:
sata-thin - Volume Group:
sata-vg - Thin Pool:
sata-thin - Content: tick Disk image, Container, and optionally VZDump backup file
- ID:
- Click Add
You now have two storage pools:
local-lvmon NVMe — fast; use this for your most important VMs (e.g. Veeam CE, Plex LXC)sata-thinon SATA SSD — more space; use this for secondary VMs, templates, and ISO storage
Tip on Discard: When creating VM or CT disks on either pool, enable Discard in the disk options. This allows the guest OS to notify Proxmox when blocks are freed, helping thin-provisioned storage reclaim space over time and extending SSD lifespan.
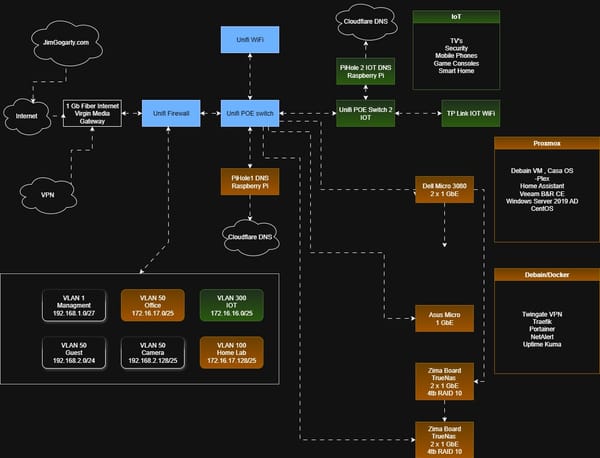
Step 6 — Network Configuration
The 3080 Micro has one onboard Intel GbE NIC. For a basic home lab, this is sufficient — all VM and host traffic shares this interface.
If you want to go further, you can add a USB-to-Ethernet adapter. This opens up useful options:
- Dedicated backup network — connect the USB NIC directly to your NAS with a single Ethernet cable, giving Veeam backup traffic its own private path and freeing the main LAN for Plex and general traffic.
- Out-of-band management — assign the USB NIC a static IP on a management VLAN, so you can always reach the Proxmox web UI even if you misconfigure the main network bridge.
Identifying your interfaces
Run this on the Proxmox shell:
ip -br link
You will see something like:
enp2s0      UP    70:b5:e8:69:22:69    ← onboard Intel NIC
enx9cebe8f589be  DOWN  9c:eb:e8:f5:89:be  ← USB NIC (named by MAC address)
Onboard NICs follow the enpXsY naming pattern. USB NICs are named enx followed by their MAC address — this makes them easy to distinguish.
Proxmox network bridges
Proxmox does not use physical NICs directly — it uses Linux bridges (vmbr0, vmbr1, etc.) as virtual switches. VMs and LXCs connect to a bridge, and the bridge connects to a physical NIC.
A clean layout for a two-NIC setup:
| Bridge | Physical NIC | IP | Purpose |
|---|---|---|---|
vmbr0 |
enp2s0 (onboard) |
172.16.17.200/24 | Primary LAN — VMs, Plex, internet |
vmbr1 |
enx… (USB) |
10.10.10.2/24 | Dedicated backup link to NAS |
Configure these in Datacenter → Node → Network. Make sure it only vmbr0 has a default gateway — having two gateways will cause routing problems.
Safety tip when reconfiguring network: Stage all your bridge changes in the GUI before clicking Apply Configuration. Proxmox applies all changes at once, minimising the time you are disconnected. If you have a second NIC available, assign it a fallback management IP before applying, so you have a way back in if something goes wrong.
Step 7 — First-Time Setup: Repositories and System Updates
This is the step most beginner guides skip, and it will bite you almost immediately if you do. Before you do anything else on the node, you need to sort out the package repositories.
Fix the package repositories
By default, Proxmox uses its enterprise repository, which requires a paid subscription. Without one, every apt update will fail with a 401 Unauthorized error. Since this is a home lab running the free Community Edition, you need to disable the enterprise repo and switch to the no-subscription repo instead.
Run the following in the Proxmox shell (your node → Shell in the top right):
bash
# Disable the enterprise repo
sed -i 's/^deb/# deb/' /etc/apt/sources.list.d/pve-enterprise.list

# Add the community no-subscription repo
echo "deb http://download.proxmox.com/debian/pve bookworm pve-no-subscription" \
  > /etc/apt/sources.list.d/pve-no-subscription.list

# Disable the Ceph enterprise repo if present
sed -i 's/^deb/# deb/' /etc/apt/sources.list.d/ceph.list 2>/dev/null || true
Now verify the repos are working:
bash
apt updateYou should see package lists downloading cleanly with no 401 errors.
Note: The no-subscription repo receives the same package updates as the enterprise repo — it is not a stripped-down version. The only difference is that enterprise customers get updates slightly earlier and have access to paid support. For a home lab, the no-subscription repo is perfectly appropriate.
Run a full system update
With the repos fixed, bring the system fully up to date before doing anything else:
bash
apt full-upgrade -yThis ensures you are running the latest Proxmox kernel, security patches, and tooling before you start creating VMs or making other changes. Reboot after this if a new kernel was installed:
bash
rebootDismiss the subscription nag
After logging into the Proxmox web UI, you will see a popup every time saying "You do not have a valid subscription for this server." Click OK to dismiss it — it is purely informational and does not restrict any functionality. It is an expected part of running the Community Edition.
Other useful first-time tweaks
A few small things worth doing while you are getting set up:
Check the time zone — confirm it matches your location in Datacenter → Node → Time. An incorrect system clock can cause problems with TLS certificates and log timestamps.
Review the default firewall — Proxmox has a built-in firewall that is off by default. If you plan to enable it later, do so carefully — locking yourself out of port 8006 (the web UI) is a common mistake. For now, leaving it off is fine if your router handles perimeter security.
Bookmark the web UI — add https://172.16.17.200:8006 to your browser favourites and accept the self-signed certificate as a permanent exception. You will be visiting this address frequently.
Step 8 — Enable Intel Quick Sync (Advanced — can do later)
The i5 10th Gen includes Intel UHD Graphics with Quick Sync Video support. This allows Plex (running in an LXC container) to use hardware-accelerated transcoding — handling multiple 1080p streams with minimal CPU load, something software transcoding cannot match on this hardware.
You do not need to do this immediately — Plex will run fine without it for now. Come back to this step once you have a Plex LXC up and running.
Install the Intel media driver on the Proxmox host:
bash
apt update
apt install -y intel-media-va-driver vainfo
Verify it is working:
bash
vainfoYou should see output including lines like:
vainfo: Driver version: Intel iHD driver for Intel(R) Gen Graphics - 23.x.x
VAProfileH264High   : VAEntrypointVLD
VAProfileHEVCMain   : VAEntrypointVLD
The error: can't connect to X server! line at the top is harmless on a headless server — ignore it.
To expose the GPU to an LXC container (for Plex), add these two lines to the container's config file at /etc/pve/lxc/<CTID>.conf:
lxc.cgroup2.devices.allow: c 226:* rwm
lxc.mount.entry: /dev/dri dev/dri none bind,optional,create=dir
Restart the container after making this change. Inside the container, run ls /dev/dri — you should see card0 and renderD128.
Step 9 — Create Your First VMs and Containers
With storage, networking and GPU support configured, the 3080 Micro is ready for workloads. Here is what I am building on my setup:
On local-lvm (NVMe — fast)
- Veeam Community Edition VM (Windows Server Core) — backup management
- Plex LXC (Debian 12) — media server with Quick Sync passthrough
On sata-thin (SATA SSD — more space)
- CasaOS/Debian VM — Docker host for Sonarr, Radarr, Prowlarr, Transmission, Overseerr
- Additional LXCs as needed (Pi-hole, Uptime Kuma, etc.)
When creating a VM or LXC, set the network bridge to vmbr0 so it gets an IP from your LAN DHCP server. For anything that other services need to reach reliably (Plex, Veeam, your NAS), consider assigning a static IP either in the Proxmox network config or via a DHCP reservation in your router.
What Comes Next
Once your Proxmox host is up and running, the natural next steps are:
- Connect a NAS — a ZimaBoard or similar running TrueNAS SCALE makes an excellent companion to a Proxmox home lab. You can expose NFS shares for VM storage and Plex media, and use the dedicated backup NIC to keep that traffic off your main LAN.
- Configure Veeam CE — back up your VMs and any Linux Docker hosts using the Veeam Community Edition, with the NAS as the backup repository.
- Set up the media stack — Plex, Sonarr, Radarr, Prowlarr and Overseerr running as Docker containers in a Debian VM give you a fully automated media library.
- Add monitoring — Uptime Kuma running in Docker provides at-a-glance visibility into all your services.
The Dell OptiPlex 3080 Micro punches well above its price point as a home lab host. With Proxmox installed, a sensible storage layout, and Quick Sync enabled, you have a capable foundation that can grow significantly before you ever need to consider an upgrade.
Have questions or run into something not covered here? Leave a comment below.uses